Light casters
Every light so far has been a single point in space, shining equally in all directions and equally far. That is a fine start, but real lights come in different kinds: the sun, a bare bulb, a torch. A source that casts light onto objects is called a
It helps to see what actually differs between them. For every pixel, the lighting from the previous chapters needs two things from a light: the direction towards it, and how much of its light arrives. The Phong terms themselves do not care what kind of light it is. So each light caster is really an answer to those two questions:
- a directional light: the same direction for every pixel, and everything arrives;
- a point light: the direction to its position, and less arrives the further away it is;
- a spotlight: like a point light, but only inside a cone.
LearnOpenGL writes a separate program for each. Our lesson is a single program with a single shader, and keys 1, 2 and 3 (or Tab) switch between the three kinds. It starts on the spotlight, number 3, which is the most fun to fly around with.
Directional light
When a light source is very far away, the rays that reach us from it are practically parallel. Wherever an object is in the scene, the light comes at it from the same direction. Model the source as infinitely far away and the light's position stops mattering altogether; only its direction is left. That is a
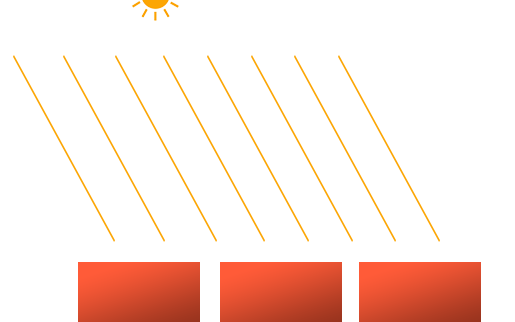
The sun is the obvious example. It is not infinitely far away, but compared to anything in our scene it might as well be, and its rays across a whole landscape are parallel for all practical purposes.
In the shader, a directional light needs no position; it is described by the direction its rays travel. Our lighting formula wants the opposite direction, from the surface towards the light, so we negate it:
float3 to_light = normalize(-light_direction);People generally find it natural to describe a light by where it points ("down, a little forward"), so that is how the constant is given, and the shader does the flipping. It also normalizes, since there is no reason to trust that a direction typed into a program has length 1. The rest of the lighting is unchanged: the diffuse and specular terms use to_light exactly as before. Our lesson's sun points mostly downwards:
sun_direction: const vec3 = { -0.2, -1.0, -0.3 }A single crate would not show off a light that treats every object alike, so this lesson brings back the ten crates from Coordinate Systems, each with its own position and a rotation that grows with its index. Their positions are kept in cube.rasm, beside the cube itself:
; world space positions of our cubes
cube_positions: [10]const vec3 = {
    {  0.0,  0.0,   0.0 },
    {  2.0,  5.0, -15.0 },
; ...
}
cube_rotation_axis: const vec3 = { 1.0, 0.3, 0.5 }
and so is the procedure that builds the model matrix of the i-th crate, a translation to its position times a rotation of 20 i degrees about a fixed axis:
cube_model_translation: mat4 = {}          ; cube_model's

; rcx: out mat4, edx: i (0..9) -> translate(cube_positions[i]) * rotate(radians(20 i), (1, 0.3, 0.5))
cube_model: proc(out: *mat4, index: u32) = {
    push rbx
    push rsi
    sub rsp, 40                            ; 32 shadow; entry 8 + two pushes 16 + 40 lands on 16
    mov rbx, rcx                           ; out
    mov esi, edx                           ; i
    cvtsi2ss xmm0, esi
    mulss xmm0, 20.0
    call radians
    movaps xmm1, xmm0                      ; the angle, the second argument
    mov rcx, rbx
    lea r8, cube_rotation_axis
    call m4_rotate
    imul eax, esi, sizeof(vec3)
    lea rdx, cube_positions
    add rdx, rax
    lea rcx, cube_model_translation
    call m4_translate
    invoke(m4_mul, rbx, cube_model_translation&, rbx)
    add rsp, 40
    pop rsi
    pop rbx
    ret
}
The output matrix and the index have to outlive three calls, so they move into rbx and esi, saved by the proc's own pushes. cvtsi2ss converts the integer index to a float. The angle in degrees is turned into radians and moved to xmm1, where sizeof(vec3), added to the table's address, which is loaded with lea first because a global cannot be indexed by a register in a 64-bit program. The translation is built in cube_model_translation, a scratch matrix named after the proc that owns it, where a C function would have used a local variable. The lesson's loop then counts in rbx:
xor ebx, ebx
cubes:
invoke(cube_model, model&, rbx)
invoke(draw_cube, transforms_buffer, t&, model&)
inc ebx
cmp ebx, 10
jb cubesrbx, one of the registers a Win64 procedure must hand back as it found it. That makes it ours to preserve too, so main pushes it first, and the push changes its frame: sub rsp, 48 instead of 56, since the push has already moved rsp by 8.
main: proc() -> i32 = {
    push rbx
    sub rsp, 48                            ; IASetVertexBuffers: 5 past `this`, 2 on the stack: 32 + 16; entry 8 + push 8 + 48 lands on 16
It never pops it again: invoke(ExitProcess, 0), which does not return, so there is no epilogue to write.
Press 1, and fly around:
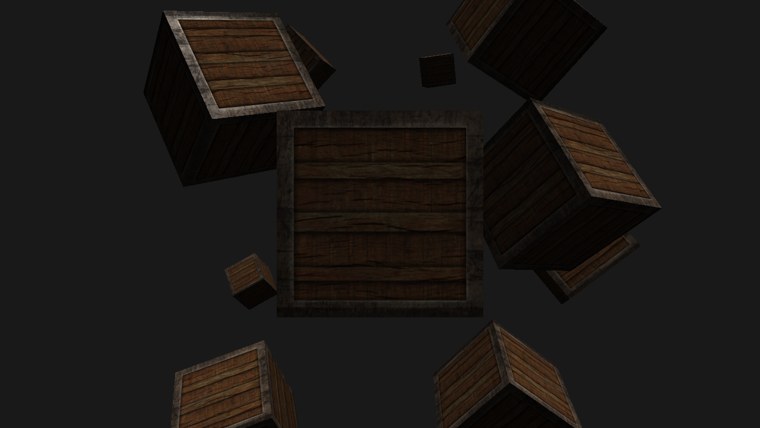
Every crate is lit as if by a sun high up in the sky. Faces turned upwards are bright on every crate alike, however near or far; faces turned away are left in ambient light. There is no light cube in this mode, since a directional light has no position to put one at.
float4 and use the fourth component to tell them apart: w = 1 for a position, which translations move, and w = 0 for a direction, which they do not. The old fixed-function OpenGL decided between positional and directional lights exactly that way. We keep an explicit mode instead, which is easier to read.
Point lights
Directional light is good for a sun lighting a whole scene, but most lights are local: a light bulb, a candle, a torch on a wall. Each sits somewhere in the world and shines in every direction, and its light grows weaker with distance. That is a
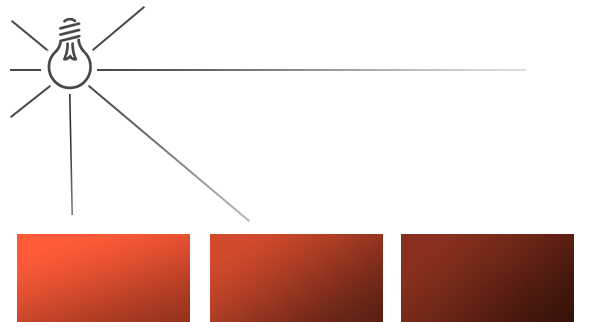
The lights of the previous chapters were point lights of a sort: they had a position and shone in all directions. What they lacked was the falloff. With ten crates you would see the problem straight away: the crate at the very back, fifteen units away, would be lit just as brightly as the one right next to the light.
Attenuation
The fading of light over distance is called
\[ F_{att} = \frac{1}{K_c + K_l \cdot d + K_q \cdot d^2} \]
where \(d\) is the distance from the pixel to the light and the three \(K\)s are knobs we choose:
- the
constant term \(K_c\) is normally 1. Its job is to keep the bottom of the fraction from dropping below 1, which would make the light brighter than its own colour very close to it. - the
linear term \(K_l\) makes the light fade in proportion to distance. - the
quadratic term \(K_q\) makes it fade with the square of distance. Close to the light it is small next to the linear term; further out it dominates, and the light dies away much faster.
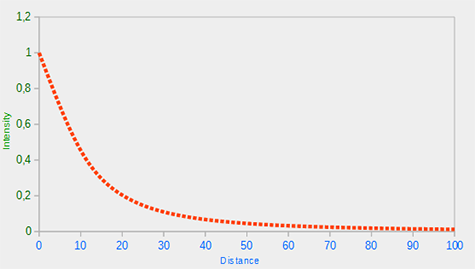
Together they give exactly the shape we wanted: intense near the light, a quick drop, then a long, slow tail. Here is the curve LearnOpenGL plots for a light reaching about 100 units:
Choosing the right values
Which values to pick depends on how far a light should reach and on the look of the scene; in the end it comes down to trying them out. A good starting point is a table of values from the Ogre3D wiki, which LearnOpenGL also uses. Each row gives terms for a light that covers roughly the distance in the first column:
| Distance | Constant | Linear | Quadratic |
|---|---|---|---|
| 7 | 1.0 | 0.7 | 1.8 |
| 13 | 1.0 | 0.35 | 0.44 |
| 20 | 1.0 | 0.22 | 0.20 |
| 32 | 1.0 | 0.14 | 0.07 |
| 50 | 1.0 | 0.09 | 0.032 |
| 65 | 1.0 | 0.07 | 0.017 |
| 100 | 1.0 | 0.045 | 0.0075 |
| 160 | 1.0 | 0.027 | 0.0028 |
| 200 | 1.0 | 0.022 | 0.0019 |
| 325 | 1.0 | 0.014 | 0.0007 |
| 600 | 1.0 | 0.007 | 0.0002 |
| 3250 | 1.0 | 0.0014 | 0.000007 |
The constant stays at 1 throughout, and the other two shrink as the reach grows, the quadratic one much faster. For scenes the size of ours, somewhere between 32 and 100 units is usually right.
Implementing attenuation
LearnOpenGL adds the three terms to its light struct as uniforms. Our lesson uses the row for 50 units for every light, so it simply writes them into the shader:
if (mode != 1)
{
    to_light = normalize(light_position - p.world);
    float d = length(light_position - p.world);
    strength = 1.0 / (1.0 + 0.09 * d + 0.032 * d * d);
}
For a point light (and the spotlight, which is built on it) the direction comes from the light's position again, as in the earlier chapters, and HLSL's
float ambient_strength = mode == 3 ? 1.0 : strength;
return float4(ambient * ambient_strength + (diffuse + specular) * strength, 1.0);
For a point light the ambient part fades too. One could leave ambient alone, so that some light reaches everywhere, but as soon as there are several lights their ambient parts pile up; attenuating them keeps each light's ambient glow near the light. (What the spotlight does differently is the next section.)
The point light stands where the light stood in the previous chapters, and its light cube is drawn there only in this mode:
point_position: const vec3 = { 1.2, 1.0, 2.0 }; only the point light is somewhere to draw a lamp
cmp light.mode, 2
jne no_lamp
invoke(update_buffer, lamp_buffer, lamp_color&, sizeof(vec4))
invoke(shader_use, lamp_shader&)
invoke(bind_constants, 1, lamp_buffer)
lea rcx, model
lea rdx, point_position
movss xmm2, 0.2 ; the scale, the third argument
call m4_translate_scale
invoke(draw_cube, transforms_buffer, t&, model&)
no_lamp:
cmp light.mode, 2 needs no size: mode is a u32 field, so rasm compares a dword.
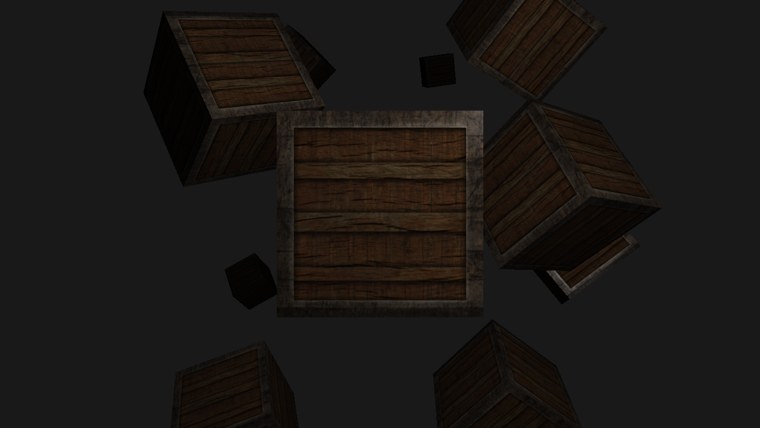
Press 2. The crates nearest the light, at the front and to the right, catch the most of it; further back it fades, and the most distant crates are left with little more than ambient light. The light cube itself is just out of view here, above and to the right of the camera; look up and right (right mouse button) to find it.
Spotlight
The last kind is the
A spotlight needs a position, the direction it points, and a
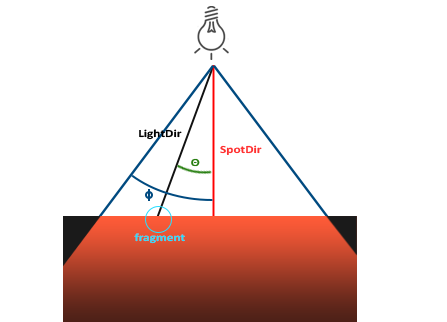
LightDirin LearnOpenGL's diagram is our to_light: from the pixel to the light.SpotDiris the direction the spotlight points.- \(\phi\) is the cutoff angle: anything further than this from the spotlight's direction is outside the cone.
- \(\theta\) is the angle between the spotlight's direction and the line from the light to the pixel. The pixel is inside the cone when \(\theta\) is smaller than \(\phi\).
As with diffuse lighting, we do not need the angle itself. The dot product of two unit vectors gives its cosine, so we compare cosines instead.
Flashlight
The spotlight in our lesson is a
; the point light sits still; the sun shines one way; the flashlight is the camera
v3load_var(xmm0, point_position)
v3store_var(light.position, xmm0)
v3load_var(xmm0, sun_direction)
v3store_var(light.direction, xmm0)
cmp light.mode, 3
jne not_spot
v3load_var(xmm0, cam.position)
v3store_var(light.position, xmm0)
v3load_var(xmm0, cam.front)
v3store_var(light.direction, xmm0)
not_spot:
invoke(update_buffer, light_buffer, light&, sizeof(light_constants))
lea is needed:
; xmm = a vec3 global. `var.z` is an ordinary field operand once var is
; substituted.
v3load_var: macro(reg, var) = {
    movsd reg, qword ptr var
    insertps reg, var.z, 0x20
}
Substituted, var.z becomes cam.front.z, a typed operand like any other, and rasm works out its address.
The cone's angles are passed as cosines, worked out once on the CPU:
; the spot's cone: 12.5 degrees fully lit, fading out by 17.5
movss xmm0, 12.5
call radians
call cosf
movss light.inner_cos, xmm0
movss xmm0, 17.5
call radians
call cosf
movss light.outer_cos, xmm0
Each call takes its float in xmm0 and returns its result there, so the calls chain without moving anything: degrees in, radians out and in again, cosine out.
This saves the shader work. The dot product hands us \(\cos\theta\); to compare angles we would have to take its arc cosine, an expensive function, for every pixel. Comparing \(\cos\theta\) with \(\cos\phi\) gives the same answer for free. There is one thing to keep straight, though: the cosine shrinks as the angle grows.
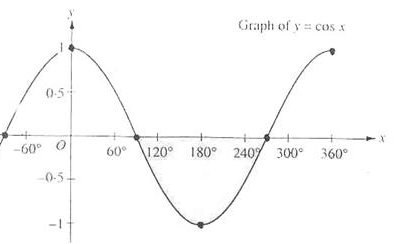
So "\(\theta\) is less than the cutoff angle" becomes "\(\cos\theta\) is greater than the cutoff's cosine". For a cutoff of 12.5 degrees, whose cosine is about 0.976, a pixel is inside the cone when \(\cos\theta\) lies between 0.976 and 1. In the shader, \(\cos\theta\) is the dot product of the direction to the light with the reversed spotlight direction:
float theta = dot(to_light, normalize(-light_direction));
Both point away from the pixel, towards the light, so their dot product is 1 when the pixel lies exactly along the beam. A first, hard-edged spotlight would light the pixel when theta > inner_cos and leave it in ambient light otherwise. That works, but the beam ends at a sharp edge, as if cut out with scissors, and real flashlights are not like that.
Smooth/soft edges
To soften the edge, we give the spotlight two cones: an
With \(\phi\) the inner cutoff's cosine and \(\gamma\) the outer one's, the intensity at a pixel is
\[ I = \frac{\theta - \gamma}{\epsilon}, \qquad \epsilon = \phi - \gamma \]
where, in keeping with the shader, \(\theta\) now stands for the cosine. It is a linear ramp between the two cosines: \(I = 1\) on the inner cone's edge, \(I = 0\) on the outer one's. Let's try it with our angles. Their cosines are \(\phi = \cos 12.5° \approx 0.976\) and \(\gamma = \cos 17.5° \approx 0.954\), so \(\epsilon \approx 0.023\). A pixel 15 degrees off the beam, halfway between the two, has \(\theta \approx 0.966\), and
\[ I \approx \frac{0.966 - 0.954}{0.023} \approx 0.54 \]
about half strength, as expected. A pixel right on the beam gives \(I \approx 2\), and one far outside a large negative number, so we clamp \(I\) to the range 0 to 1. HLSL has a function for exactly that clamp,
if (mode == 3)
{
    // 1 inside the inner cone, 0 outside the outer one, a ramp between.
    float theta = dot(to_light, normalize(-light_direction));
    strength *= saturate((theta - outer_cos) / (inner_cos - outer_cos));
}
Once clamped, the intensity needs no if at all: it simply multiplies into strength, on top of the distance attenuation the spotlight inherits from point lights. The ambient part is the exception. Looking back at the last line of the shader, in spot mode the ambient term gets a strength of 1, untouched by both the cone and the distance:
// The flashlight leaves ambient alone, so outside its cone is dark but not black.
float ambient_strength = mode == 3 ? 1.0 : strength;
Without that, everything outside the beam would be pure black, which is too harsh even for a dark scene.
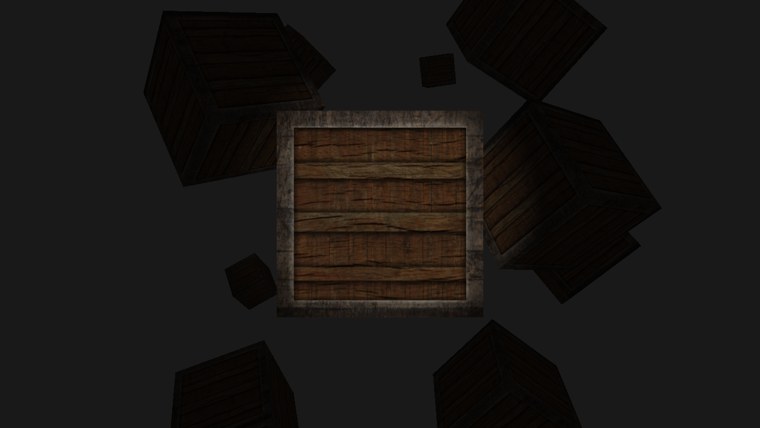
Press 3, or just start the program. The beam lights the crate in front of us with a soft edge, and everything else waits in the dark until we turn towards it. Perfect for a horror game.
Switching between them
Here is how one shader does all three. The light's constant buffer carries everything any of the modes needs, plus the mode itself:
cbuffer light : register(b1)
{
    float3 light_position;
    int mode;               // 1 directional, 2 point, 3 spot
    float3 light_direction; // where the light points
    float inner_cos;
    float3 light_ambient;
    float outer_cos;
    float3 light_diffuse;
    float shininess;
    float3 light_specular;
};
Look at how it is arranged: every scalar sits right after a float3, filling the spare four bytes of that register. Five registers hold the lot. The rasm struct follows the same order, and so it needs only one pad at the very end:
; Mirrors `cbuffer light` in light_casters.hlsl.
light_constants: struct = {
    position: vec3
    mode: u32                              ; 1 directional, 2 point, 3 spot
    direction: vec3
    inner_cos: f32                         ; cosines, so the shader compares without an acos
    ambient: vec3
    outer_cos: f32
    diffuse: vec3
    shininess: f32
    specular: vec3
    pad: f32
}
mode is a u32, a four-byte integer, read by HLSL's int (the values are small, so the sign never matters); f32 is the four-byte float. Both take the same space, so the packing works out exactly as for the floats around it. The parts that never change are written where the light is declared; the mode, the position, the direction and the two cosines are left out, zero, and filled in by the program:
light: light_constants = {
    .ambient = { 0.1, 0.1, 0.1 },
    .diffuse = { 0.8, 0.8, 0.8 },
    .shininess = 32.0,
    .specular = { 1.0, 1.0, 1.0 },
}                                          ; the rest is set at run time
The keys are read the way Hello Triangle reads Tab, and since several lessons from here on switch between modes, the reading lives in window.rasm. The window procedure records each key press as it arrives, ignoring the repeats Windows sends while a key is held. It has no frame and keeps its four parameters in the registers they arrived in, r8 the key's wparam and r9 its lparam, so that anything it does not handle can jump to pass_on) with all four still in place:
on_key:
; Bit 30 of lparam is set when the key was already down: a repeat.
bt r9, 30
jc pass_on
cmp r8, 256
jae pass_on
lea rax, window_keys_pressed
mov byte ptr [rax + r8], 1
xor eax, eax
ret
bt copies one bit into the carry flag, so jc skips repeats.
invoke(window_mode, 3)
inc eax                                ; modes count from 0, the shader's from 1
mov light.mode, eax
At startup, invoke(window_mode_default, 2) makes the third mode, the spotlight, the one the program starts in, unless the command line's --mode asked for another; that is how the screenshots on this page were taken.
The branches in the shader depend only on mode, which is the same for every pixel of a draw, so the GPU never has to run both sides of one for different pixels; switching this way costs next to nothing.
The full program is here, and its shader here.
Additional resources
- Point light attenuation, from the Ogre3D wiki: the source of the table above.
- saturate: HLSL's clamp to 0..1.
- LearnOpenGL's Light casters: the OpenGL version of this chapter.
Exercises
- Make the spotlight hard-edged, lit when
theta > inner_cosand unlit otherwise, and compare. Then try<instead of>, and drop the minus sign from-light_direction; explain what you see in each case. - Try other rows of the attenuation table for the point light, such as 13 or 100, and watch how far into the scene the light reaches.
- Turn the flashlight into a fixed lamp: give the spotlight a position above the crates and a direction straight down, instead of the camera's. Draw the light cube there too.