Camera
In the last chapter the view matrix pushed the world three units away, and that was our whole camera. Direct3D has no idea what a camera is, and neither does OpenGL. What we can do is move the entire world the opposite way to how a camera would move, and the result on screen is indistinguishable from moving the camera. This chapter turns that idea into a learn/camera.rasm, which every later lesson uses.
Camera/View space
View space is the world as the camera sees it, with the camera at the origin. To build the matrix that takes world coordinates there, we need four things in world space: where the camera is, which way it looks, and which ways are its right and its up. Those last three are unit vectors at right angles to each other, so together with the position they form a little coordinate system of the camera's own:
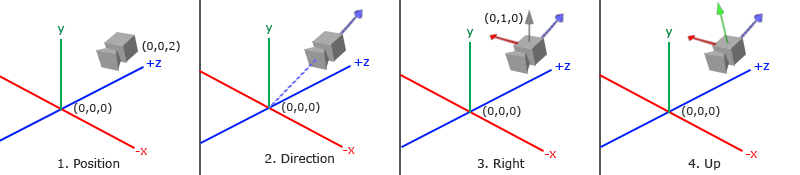
1. Camera position
The position is just a point in world space. The last chapter's view matrix put the camera three units back along +z, which is towards us in our right-handed world: the camera is at (0, 0, 3).
2. Camera direction
Next, which way it looks. Say it looks at the origin. Subtracting two points gives the vector from one to the other, so target - position points from the camera at its target, and normalized it is the
3. Right axis
The right vector is the camera's +x axis. The cross product gives us a vector perpendicular to two others, so if we can find a second vector besides front, we are done. The trick is to use the world's up, (0, 1, 0). It is not the camera's up unless the camera looks straight ahead, but it does not need to be: it only needs to lie in the plane that front and the camera's up share, and for any camera that is not looking straight up or down, it does. Then
\[\hat{R} = \text{normalize}(\text{front} \times \text{up}_{world})\]points to the camera's right. Swap the two and it points left.
4. Up axis
With front and right known, the camera's true up is perpendicular to both, which is one more cross product: \(\hat{U} = \hat{R} \times \text{front}\). Building a set of perpendicular axes from a couple of starting vectors like this is a form of the
Look At
Here is a useful fact about matrices: given three perpendicular unit axes, a matrix whose rows are those axes takes any vector into the coordinate system they define. Each row dotted with the vector gives the vector's component along that axis. Add a translation that first moves the camera's position to the origin, and we have a matrix that takes world space into the camera's view space, the
\(\color{red}R\) is the right vector, \(\color{green}U\) the up vector, \(\color{blue}D\) the backward-pointing direction from step 2, and \(\color{purple}P\) the camera's position. Read it right to left: first move the world so the camera's position is at the origin (that is why the translation is negated), then rotate it so the camera's axes line up with x, y and z. Both halves do the opposite of what the camera did, which is exactly the "move the world instead" idea.
math.rasm builds this matrix in glm::lookAt, from a position, a target and a world up, all three passed by address. Its three working vectors are globals named after it:
look_at_f: vec3 = {}                       ; forward
look_at_s: vec3 = {}                       ; side (right)
look_at_u: vec3 = {}                       ; up

; rcx: out, rdx: eye, r8: target, r9: up (all vec3)
;
; The view matrix of a camera at `eye` looking at `target`.
m4_look_at: proc(out: *mat4, eye: *const vec3, target: *const vec3, up: *const vec3) = {
    push rbx
    push rsi
    push rdi
    sub rsp, 32                            ; 32 shadow; entry 8 + three pushes 24 + 32 lands on 16
    mov rbx, rcx                           ; out
    mov rsi, rdx                           ; eye
    mov rdi, r9                            ; up

    lea rcx, look_at_f                     ; f = normalize(target - eye)
    mov rdx, r8
    mov r8, rsi
    call v3_sub
    lea rcx, look_at_f
    lea rdx, look_at_f
    call v3_normalize
    lea rcx, look_at_s                     ; s = normalize(cross(f, up))
    lea rdx, look_at_f
    mov r8, rdi
    call v3_cross
    lea rcx, look_at_s
    lea rdx, look_at_s
    call v3_normalize
    lea rcx, look_at_u                     ; u = cross(s, f)
    lea rdx, look_at_s
    lea r8, look_at_f
    call v3_cross

    mov rcx, rbx
    call m4_identity
    v3load(xmm4, rsi)                      ; eye
    ; row 0: s, -dot(s, eye)
    v3load_var(xmm0, look_at_s)
    movups xmmword ptr [rcx], xmm0
    dpps xmm0, xmm4, 0x71
    xorps xmm0, math_sign_mask
    movss [rcx].mat4.m[3], xmm0
    ; row 1: u, -dot(u, eye)
    v3load_var(xmm0, look_at_u)
    movups xmmword ptr [rcx + 16], xmm0
    dpps xmm0, xmm4, 0x71
    xorps xmm0, math_sign_mask
    movss [rcx].mat4.m[7], xmm0
    ; row 2: -f, dot(f, eye)
    v3load_var(xmm0, look_at_f)
    movaps xmm1, xmm0
    xorps xmm1, math_sign_mask
    movups xmmword ptr [rcx + 32], xmm1
    dpps xmm0, xmm4, 0x71
    movss [rcx].mat4.m[11], xmm0
    add rsp, 32
    pop rdi
    pop rsi
    pop rbx
    ret
}
It is steps 2 to 4 in order: look_at_f is front, look_at_s the right vector ("side"), look_at_u the camera's up, which needs no normalizing since it is the cross product of two perpendicular unit vectors. The output, the eye and the up arrive in rcx, rdx and r9, registers the calls are free to change, so they are copied into rbx, rsi and rdi, which survive them; three pushes and sub rsp, 32 make the frame. The three rows are R, U and D, with D written as -f. Each row is stored whole, four floats with one movups; [rcx].mat4.m[3] is element 3 of the matrix rcx points at: an index counts elements, so rasm turns it into byte 12. rcx is still the output after xmm0 and eax, a promise math.rasm states at its top.
The last column is the two matrices of the formula already multiplied together: rotating the translation \(-P\) by the rows gives \(-R \cdot P\), \(-U \cdot P\) and \(-D \cdot P = f \cdot P\), which are the three dot products, each a dpps with the eye, negated with xorps where the formula has a minus. So a camera at (0, 0, 3) looking at the origin, with up (0, 1, 0), gives exactly the translation by (0, 0, -3) of the last chapter.
Before taking input, a quick way to get a feel for it is to swing the camera around the scene. Keep the target at the origin and move the position around a circle of radius 10, using a sine and a cosine of the time for x and z: the eye at \((10 \sin t, 0, 10 \cos t)\), handed to
Walk around
To steer the camera ourselves we stop thinking in terms of a target and keep a position + front, however we move. That is how the camera asks for its view matrix, in learn/camera.rasm:
camera_view_target: vec3 = {}              ; camera_view's: position + front

; rcx: out mat4, rdx: camera
camera_view: proc(out: *mat4, cam: *const camera) = {
    push rbx
    push rsi
    sub rsp, 40                            ; 32 shadow; entry 8 + two pushes 16 + 40 lands on 16
    mov rbx, rcx                           ; out
    mov rsi, rdx                           ; the camera
    lea rcx, camera_view_target
    lea rdx, [rsi].camera.position
    lea r8, [rsi].camera.front
    call v3_add
    lea rdx, [rsi].camera.position
    lea r9, [rsi].camera.up
    invoke(m4_look_at, rbx, rdx, camera_view_target&, r9)
    add rsp, 40
    pop rsi
    pop rbx
    ret
}
rsi holds the address of a camera structure, and [rsi].camera.front is a field of the structure rsi points at: C's c->front. rasm needs the type named, since a register has none, and works out the offset from it. lea computes that field's address without reading it, which is what rdx and r9 are passed into themselves, the second and fourth arguments, so nothing is overwritten on the way: rcx is filled from rbx, and r8 with the target's address.
Moving is now adding to the position. Forward and backward go along front; left and right go along the right vector, the cross product of front and up, which gives the sideways "strafe" movement everyone knows from games. LearnOpenGL checks keys with learn/window.rasm, built on Win32's
; ecx: virtual key -> eax: 1 while it is held. The top bit of
; GetAsyncKeyState is set while a key is down, which makes the SHORT negative.
key_down: proc(vkey: u32) -> b32 = {
    push rbx
    sub rsp, 32                            ; 32 shadow; entry 8 + push 8 + 32 lands on 16
    mov ebx, ecx
    call GetForegroundWindow
    cmp rax, window
    jne up
    invoke(GetAsyncKeyState, rbx)
    test ax, ax
    jns up
    mov eax, 1
    jmp done
  up:
    xor eax, eax
  done:
    add rsp, 32
    pop rbx
    ret
}
and ifs, it walks a table of six keys, one for each direction the camera knows, in the order of the CAMERA_ constants:
#define CAMERA_FORWARD 0
#define CAMERA_BACKWARD 1
#define CAMERA_RIGHT 2
#define CAMERA_LEFT 3
#define CAMERA_UP 4
#define CAMERA_DOWN 5
; ...
; the key for each CAMERA_ direction, in order
camera_keys: [6]const u8 = { 'W', 'S', 'D', 'A', VK_SPACE, VK_SHIFT }
lea rbx, camera_keys
xor esi, esi
keys:
movzx ecx, byte ptr [rbx + rsi]
call key_down
test eax, eax
jz next_key
movss xmm2, dword ptr [r12]
invoke(camera_process_keyboard, rdi, rsi)
next_key:
inc esi
cmp esi, 6
jb keys
Letter keys are identified by their capital letter's character code, so 'W' is the W key; other keys have VK_ names. Besides LearnOpenGL's four, Space and Shift move straight up and down, which makes it easier to get above or below the crates. The key goes straight into ecx, where call. The index into the table is the direction, so a held key passes its own index to the camera, along with the frame's duration as the third argument, a float, in xmm2; rdi and the duration's address in r12, both saved by its own pushes. The camera does the actual moving:
camera_keyboard_step: vec3 = {}            ; camera_process_keyboard's

; rcx: camera, edx: CAMERA_FORWARD ... CAMERA_DOWN, xmm2: seconds since the last frame
camera_process_keyboard: proc(cam: *camera, direction: u32, seconds: f32) = {
    push rbx
    sub rsp, 32                            ; 32 shadow; entry 8 + push 8 + 32 lands on 16
    mov rbx, rcx
    mulss xmm2, [rbx].camera.speed         ; how far this frame
    mov eax, edx
    lea rdx, [rbx].camera.front
    cmp eax, CAMERA_RIGHT
    jb along
    lea rdx, [rbx].camera.right
    cmp eax, CAMERA_UP
    jb along
    lea rdx, [rbx].camera.world_up
  along:
    ; forward, right and up (even) add the step; backward, left and down (odd) subtract it
    test eax, 1
    jz forwards
    xorps xmm2, math_sign_mask
  forwards:
    lea rcx, camera_keyboard_step
    call v3_scale
    lea rcx, [rbx].camera.position
    mov rdx, rcx
    lea r8, camera_keyboard_step
    call v3_add
    add rsp, 32
    pop rbx
    ret
}
The order of the constants does the work of a switch: directions 0 and 1 move along front, 2 and 3 along right, 4 and 5 along the world up, and the odd ones move backwards, by negating the step. The step, speed times seconds, is still in xmm2 when
Every vector it moves along is a unit vector, so a step is always step units long whatever way the camera faces. That matters for the right vector in particular: the cross product of front and world up gets shorter as front tilts towards up or down, and without normalizing it (the camera stores it normalized) strafing would slow down as you looked at the sky.
Movement speed
If each frame moved the camera a fixed amount, its speed would depend on the frame rate: a machine drawing 300 frames a second would fly five times faster than one drawing 60. Our lessons present with a sync interval of 1, vcall(swap_chain, IDXGISwapChainVtbl.Present, 1, 0) in
The usual cure is learn/window.rasm's
; -> xmm0: seconds since the window was created: what glfwGetTime is to
; LearnOpenGL. Stopped at --time while taking a --shot.
get_time: proc() -> f32 = {
    sub rsp, 40                            ; 32 shadow, and rsp back on 16
    cmp window_shot_path[0], 0
    je running
    movss xmm0, window_shot_time
    jmp done
  running:
    invoke(QueryPerformanceCounter, window_time_now&)
    mov rax, window_time_now
    sub rax, window_perf_start
    cvtsi2sd xmm0, rax
    cvtsi2sd xmm1, window_perf_frequency
    divsd xmm0, xmm1
    cvtsd2ss xmm0, xmm0
  done:
    add rsp, 40
    ret
}
Counting from the window's creation rather than from when Windows started keeps the number small, which matters for a 32-bit float: after a few days of uptime, raw seconds would no longer have the precision to tell one frame from the next. At the top of every frame the render loop works out the delta:
; per-frame time logic
; --------------------
call get_time
movss xmm1, xmm0
subss xmm0, last_frame
movss delta_time, xmm0
movss last_frame, xmm1
and its address is passed to xmm2. With the camera's speed of 2.5, that is 2.5 units a second on any machine:
invoke(camera_process_input, cam&, delta_time&)
Passing the float by address keeps the call an ordinary xmm register first. delta_time and last_frame are two f32 globals of the lesson, initialised to 0.0.
Look around
Moving without turning gets boring quickly. To look around we have to change front, and for that we use the mouse. Turning mouse movement into a direction takes a little trigonometry. If it does not interest you, the code is short and can be used as it is; come back to the explanation when you want it.
Euler angles
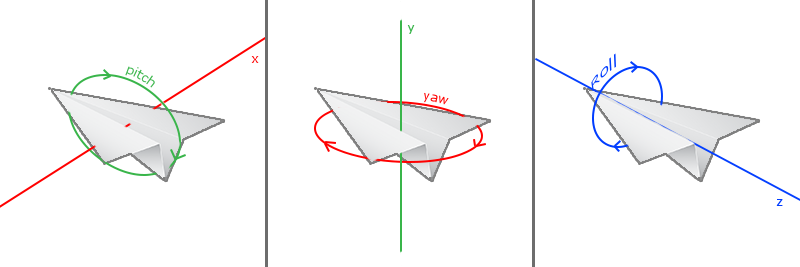
Pitch is how far we look up or down, yaw how far we look left or right, and roll how far we tilt sideways, as an aircraft banks. A fly camera like ours needs only yaw and pitch, and from those two angles we can work out front.
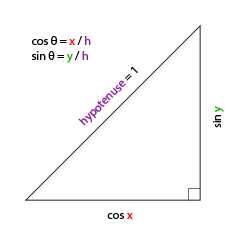
Start with a reminder about right-angled triangles. If the long side has length 1, the side next to an angle has length \(\cos\) of the angle and the side opposite it has length \(\sin\):
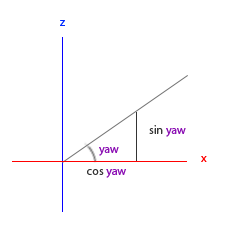
Now look down on the scene from above, along the y axis, so that the x and z axes form the floor. Put the yaw angle at the origin, measured from the x axis. A unit-length front vector is the long side of a triangle whose x side is \(\cos(\text{yaw})\) and whose z side is \(\sin(\text{yaw})\):
Pitch works the same way, but in the vertical plane: the y component of front is \(\sin(\text{pitch})\), and the part along the floor shrinks to \(\cos(\text{pitch})\):
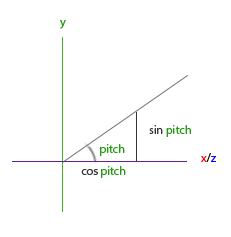
Since the floor part is now only \(\cos(\text{pitch})\) long, both floor components get multiplied by it, and the whole thing is:
\[\text{front} = \begin{pmatrix} \cos(\text{yaw}) \cos(\text{pitch}) \\ \sin(\text{pitch}) \\ \sin(\text{yaw}) \cos(\text{pitch}) \end{pmatrix}\]In the camera, along with the right and up vectors that follow from it (the angles are kept in degrees, and converted first):
; camera_update_vectors's: math.asm's locals
camera_update_yaw: f32 = 0.0               ; radians
camera_update_pitch: f32 = 0.0
camera_update_cos_pitch: f32 = 0.0

; rcx: camera. front, right and up from yaw and pitch.
camera_update_vectors: proc(cam: *camera) = {
    push rbx
    sub rsp, 32                            ; 32 shadow; entry 8 + push 8 + 32 lands on 16
    mov rbx, rcx
    movss xmm0, [rbx].camera.yaw
    call radians
    movss camera_update_yaw, xmm0
    movss xmm0, [rbx].camera.pitch
    call radians
    movss camera_update_pitch, xmm0
    call cosf
    movss camera_update_cos_pitch, xmm0
    ; front = normalize(cos(yaw) cos(pitch), sin(pitch), sin(yaw) cos(pitch))
    movss xmm0, camera_update_yaw
    call cosf
    mulss xmm0, camera_update_cos_pitch
    movss [rbx].camera.front.x, xmm0
    movss xmm0, camera_update_pitch
    call sinf
    movss [rbx].camera.front.y, xmm0
    movss xmm0, camera_update_yaw
    call sinf
    mulss xmm0, camera_update_cos_pitch
    movss [rbx].camera.front.z, xmm0
    lea rcx, [rbx].camera.front
    mov rdx, rcx
    call v3_normalize
    ; right = normalize(cross(front, world_up)), up = normalize(cross(right, front))
    lea rcx, [rbx].camera.right
    lea rdx, [rbx].camera.front
    lea r8, [rbx].camera.world_up
    call v3_cross
    lea rcx, [rbx].camera.right
    mov rdx, rcx
    call v3_normalize
    lea rcx, [rbx].camera.up
    lea rdx, [rbx].camera.right
    lea r8, [rbx].camera.front
    call v3_cross
    lea rcx, [rbx].camera.up
    mov rdx, rcx
    call v3_normalize
    add rsp, 32
    pop rbx
    ret
}
The camera's address is kept in rbx, which survives the calls to f32 globals that belong to this procedure. [rbx].camera.front.x goes two fields deep, a vec3 inside the camera and its x, and is four bytes, so movss needs no size. Every vector procedure is called with the same output and input address where it updates a vector in place, which math.rasm allows.
The right and up are steps 3 and 4 from the start of the chapter, recomputed whenever the angles change. With a yaw of 0 the formula points front along +x. Our scenes are laid out down -z, so a camera that should look straight into them needs a yaw of -90 degrees, as the comment in the camera structure says. Our lesson starts the camera a little to the left of and above the crates and turned towards them, with camera_start: const vec3 = { -1.5, 1.0, 4.0 } in its data:
; yaw and pitch are floats, the third and fourth arguments: xmm2 and xmm3.
lea rcx, cam
lea rdx, camera_start
movss xmm2, -70.0                      ; yaw
movss xmm3, -10.0                      ; pitch
call camera_create
that is, at (-1.5, 1, 4), with a yaw of -70 degrees (20 degrees to the right of straight down -z) and a pitch of -10 (looking slightly down). Yaw and pitch are the third and fourth arguments, so they go in xmm2 and xmm3, and the camera's and the position's addresses in rcx and rdx. -70.0 is a float literal, so movss loads it from a constant that rasm places in read-only data. jmp camera_update_vectors: with the camera still in rcx, a jump instead of a call lets
Mouse input
Yaw and pitch come from the mouse: moving it sideways changes the yaw, moving it up and down changes the pitch. Each frame we compare where the mouse is with where it was the frame before, and turn by the difference.
LearnOpenGL hides and captures the cursor with learn/window.rasm's
; Screen y grows downwards, so moving the mouse up is a positive dy here:
; pitch up.
invoke(GetCursorPos, window_cursor&)
mov eax, window_cursor.x
sub eax, window_last_cursor.x
cvtsi2ss xmm0, eax
movss window_mouse_dx, xmm0
mov eax, window_last_cursor.y
sub eax, window_cursor.y
cvtsi2ss xmm0, eax
movss window_mouse_dy, xmm0
mov eax, window_cursor.x
mov window_last_cursor.x, eax
mov eax, window_cursor.y
mov window_last_cursor.y, eax
and
; Hold the right mouse button to look around.
invoke(key_down, VK_RBUTTON)
test eax, eax
jz no_look
movss xmm1, window_mouse_dx
movss xmm2, window_mouse_dy
invoke(camera_process_mouse, rdi)
no_look:
xmm1 and xmm2, and
Notice that window_last_cursor is updated every frame, whether the button is held or not, and also while another window has the focus (the offsets are then set to zero). That avoids the problem LearnOpenGL solves with its firstMouse flag: when the cursor is first captured, the first offset is measured from some stale position and the view jumps. Here the previous position is never more than a frame old, so the first frame of a drag turns the camera only by however far the mouse moved in that frame.
The camera turns the offsets into angles:
; rcx: camera, xmm1: dx, xmm2: dy (pixels; up is positive)
;
; Pitch stops short of straight up and down, where the view would flip.
camera_process_mouse: proc(cam: *camera, dx: f32, dy: f32) = {
    push rbx
    sub rsp, 32                            ; 32 shadow; entry 8 + push 8 + 32 lands on 16
    mov rbx, rcx
    mulss xmm1, [rbx].camera.sensitivity
    addss xmm1, [rbx].camera.yaw
    movss [rbx].camera.yaw, xmm1
    mulss xmm2, [rbx].camera.sensitivity
    movss xmm0, [rbx].camera.pitch
    addss xmm0, xmm2
    movss xmm1, -89.0
    movss xmm2, 89.0
    call clampf
    movss [rbx].camera.pitch, xmm0
    mov rcx, rbx
    call camera_update_vectors
    add rsp, 32
    pop rbx
    ret
}
sensitivity is 0.1, a tenth of a degree per pixel; without it the camera would spin wildly. Yaw is left free, so we can turn round as often as we like. Pitch is clamped to 89 degrees either way, and the reason goes back to step 3. At a pitch of exactly 90, front would point straight along the world up, and the cross product of two parallel vectors is zero.
Zoom
Last, the scroll wheel zooms. In the last chapter we saw that the field of view sets how much of the scene fits on the screen. Make it smaller and a smaller part of the world is spread over the same screen, which looks like zooming in, exactly like a telephoto lens.
A turn of the wheel is an event, not a state we can poll, so it arrives in learn/window.rasm's window procedure as a WM_MOUSEWHEEL message, where LearnOpenGL would register a scroll callback:
on_wheel:
; The high word of wparam is the distance turned, WHEEL_DELTA (120) a notch.
mov rax, r8
shr eax, 16
movsx eax, ax
cvtsi2ss xmm0, eax
divss xmm0, 120.0
addss xmm0, window_scroll
movss window_scroll, xmm0
xor eax, eax
ret
The window procedure's parameters stay in their registers, so wparam is r8. The distance is a signed 16-bit number, positive when the wheel turns away from you, in units of 120 per notch (finer-grained wheels report fractions of a notch). movsx sign-extends the 16 bits to 32, so a turn towards you stays negative. We collect it in window_scroll, and xmm1, and resets it:
movss xmm1, window_scroll
invoke(camera_process_scroll, rdi)
mov window_scroll, 0
(an integer 0 stored into an f32 is the bits of 0.0, and the global's type gives the store its size), and the camera narrows its field of view:
; rcx: camera, xmm1: wheel notches. Zooming is narrowing the field of view.
camera_process_scroll: proc(cam: *camera, notches: f32) = {
    addss xmm1, xmm1                       ; 2 degrees a notch
    movss xmm0, [rcx].camera.zoom
    subss xmm0, xmm1
    movss xmm1, 1.0
    movss xmm2, 45.0
    maxss xmm0, xmm1                       ; clampf, written in place: this is a leaf
    minss xmm0, xmm2
    movss [rcx].camera.zoom, xmm0
    ret
}
Each notch narrows the field of view by 2 degrees, from 45 degrees at the widest down to 1. The clamp is maxss and minss written out rather than a call to rcx and the xmm registers it was given. The projection matrix is now rebuilt every frame with the camera's zoom as its field of view, the same call as in the last chapter with cam.zoom in place of 45, and the view matrix comes from the camera:
; view from the camera; projection with the camera's zoom as its field of view
invoke(camera_view, c.view&, cam&)
movss xmm0, 100.0
movss dword ptr [rsp + 32], xmm0       ; z_far
movss xmm0, cam.zoom
call radians
movaps xmm1, xmm0                      ; fovy
cvtsi2ss xmm2, scr_width
cvtsi2ss xmm0, scr_height
divss xmm2, xmm0                       ; aspect
movss xmm3, 0.1                        ; z_near
lea rcx, c.projection
call m4_perspective
camera.rasm also has this as a procedure, learn/cube.rasm's
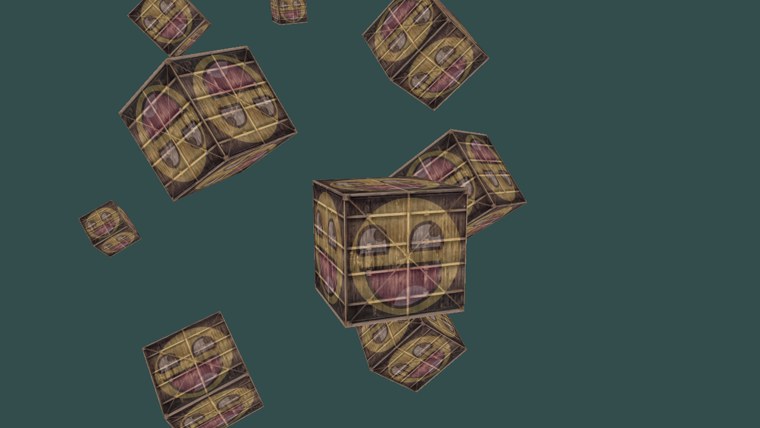
That is everything. The ten crates are the same as in the last chapter, standing still this time so that the only motion is ours. Fly in among them with W A S D, hold the right button to look around, and scroll to zoom:
Camera class
All of this is in includes/learn/camera.rasm, so that later lessons can use a camera without repeating it, just as LearnOpenGL moves its camera into a Camera class. Assembly has structures and procedures rather than classes, so the camera is a structure, declared in rasm with typed fields:
camera: struct = {
    position: vec3
    front: vec3
    up: vec3
    right: vec3
    world_up: vec3
    yaw: f32                               ; degrees; -90 looks down -z
    pitch: f32                             ; degrees
    speed: f32                             ; units per second
    sensitivity: f32                       ; degrees per pixel of mouse movement
    zoom: f32                              ; vertical field of view, degrees
}
with procedures that take its address: cam: camera = {}, and in the debugger's Watch window it unfolds into these fields by name. The whole file is a little under three hundred lines with its comments; read it once, and you have read every camera in the rest of the tutorial.
This is a fly camera built on Euler angles, which suits looking around a scene, but every kind of camera has its own catches. Ours cannot look straight up or down, and its fixed world up of (0, 1, 0) means it cannot roll: a flight-simulator camera that banks needs a different approach, usually with quaternions. A first-person camera that walks rather than flies needs movement confined to the floor, which is one of the exercises below.
The full program is here, its shaders here, and the camera here.
Additional resources
- GetAsyncKeyState and WM_MOUSEWHEEL: Microsoft's reference for the two ways our lessons read input.
- Acquiring high-resolution time stamps: how
QueryPerformanceCounter works and why to prefer it. - LearnOpenGL's Camera: the OpenGL version of this chapter, with GLFW's callbacks and a captured cursor.
Exercises
- Turn the fly camera into a first-person camera that stays on the floor: looking around works as before, but W A S D move only in the xz plane, and Space and Shift do nothing. (Moving along front with its y component removed is not quite enough: normalize it again, with
v3_normalize .) - Write your own look-at as the product of the two matrices in the formula at the start of this chapter, built from
m4_identity and the R, U and D vectors, and use it in place ofm4_look_at incamera_view . Nothing should change on screen. - Make the camera behave like LearnOpenGL's: always looking, without holding a button. Hide the cursor with
ShowCursor , and every frame move it back to the centre of the window withSetCursorPos , measuring the offset from the centre instead of from window_last_cursor (inwindow_poll , or in a copy of it).