Bloom
A monitor cannot show anything brighter than its own white, so very bright light is hard to put across on screen. A lamp of strength 15 and a lamp of strength 1.5 can both end up as the same white pixels. Our eyes and cameras give us a clue to work with: around a very bright source, light seems to spill over its edges into the surroundings, because a little of it scatters in the lens. We read that halo as "this is intensely bright". Reproducing it in a renderer is the
Bloom is a post-processing effect: it works on the finished image, not on the geometry. It is easy to overdo (some games have made everything glow like a dream sequence), but used with restraint it makes light sources and brightly lit surfaces read as bright in a way that tone mapping alone cannot.
Bloom and HDR are often mentioned in the same breath, and sometimes confused, but they are separate techniques. Bloom can be done on an 8-bit image, and HDR is useful without bloom. They just work very well together: with HDR values, "bright" can mean "above 1", a threshold that ordinary lit surfaces rarely cross, so we get precise control over what glows.
The recipe has three steps:
- Render the lit scene in HDR, and at the same time make a second image that contains only the pixels brighter than some threshold.
- Blur that second image. The blur is what spreads the light past the edges of the bright regions, and its size and shape decide what the glow looks like.
- Add the blurred image back on top of the scene, then tone map the sum as in the previous chapter.
Most of the quality of the effect lives in step 2. The first and last steps are a few lines each; the blur is where the choices are. We take the steps in order.
Extracting bright colour
Step 1 needs two images out of one render of the scene. We could draw the scene twice, once per image, but the pipeline can do better: a pixel shader can write to several render targets at once. This is
invoke(create_render_target, color_target&, SCR_WIDTH, SCR_HEIGHT, DXGI_FORMAT.DXGI_FORMAT_R16G16B16A16_FLOAT, 1)
invoke(create_render_target, bright_target&, SCR_WIDTH, SCR_HEIGHT, DXGI_FORMAT.DXGI_FORMAT_R16G16B16A16_FLOAT, 1)
invoke(create_depth_buffer, SCR_WIDTH, SCR_HEIGHT, 1)
mov scene_depth, rax
color_target& is the global's address, a constant the linker fills in, and the format is a qualified member of its enum, DXGI_FORMAT.DXGI_FORMAT_R16G16B16A16_FLOAT. The array of views is a global of two pointers, declared with its type, scene_targets: [2]*ID3D11RenderTargetView = {}, and filled in once the targets exist:
mov rax, color_target.rtv
mov scene_targets[0], rax
mov rax, bright_target.rtv
mov scene_targets[1], rax
The index counts elements, not bytes: scene_targets[1] is the second pointer, 8 bytes in, and rasm knows the element size from the declaration.
call unbind_textures
vcall(context, ID3D11DeviceContextVtbl.OMSetRenderTargets, 2, scene_targets&, scene_depth)
vcall(context, ID3D11DeviceContextVtbl.ClearRenderTargetView, color_target.rtv, no_color&)
vcall(context, ID3D11DeviceContextVtbl.ClearRenderTargetView, bright_target.rtv, no_color&)
movss xmm3, 1.0                        ; the depth, a float: xmm3
vcall(context, ID3D11DeviceContextVtbl.ClearDepthStencilView, scene_depth, D3D11_CLEAR_FLAG.D3D11_CLEAR_DEPTH, 0, 0)
That is all the setup there is. OpenGL attaches the two textures to one framebuffer object and then needs no_color: [4]const f32 = { 0.0, 0.0, 0.0, 0.0 }, passed by address. The depth is a float literal, which in rasm is a constant pooled in .rdata: movss xmm3, 1.0 loads it into the register of the fourth argument, and the COM methods are named by their slot in the interface's table, ID3D11DeviceContextVtbl.ClearDepthStencilView.
On the shader side, a pixel shader writes several targets by returning a struct whose members carry the semantics SV_Target0, SV_Target1 and so on, the number being the slot in the array we bound:
// two outputs: SV_Target0 goes to the first bound target, SV_Target1 to the second
struct bloom_out
{
    float4 color : SV_Target0;
    float4 bright : SV_Target1;
};

bloom_out ps_main(vs_out p)
{
    float3 color = emit_color.rgb;
    if (emit_color.w == 0.0)
    {
        float3 base = albedo.Sample(linear_wrap, p.uv).rgb;
        float3 n = normalize(p.normal);
        color = 0.02 * base;
        for (int i = 0; i < 4; i++)
        {
            float3 to_light = light_positions[i].xyz - p.world;
            float d = length(to_light);
            color += max(dot(n, to_light / d), 0.0) * base * light_colors[i].rgb / (d * d);
        }
    }
    bloom_out o;
    o.color = float4(color, 1.0);
    // perceived brightness; anything above 1 goes to the blur
    float brightness = dot(color, float3(0.2126, 0.7152, 0.0722));
    o.bright = float4(brightness > 1.0 ? color : 0.0, 1.0);
    return o;
}
The lighting is the same diffuse-plus-inverse-square as in the HDR tunnel, with a touch of ambient. One shader draws both the crates and the light cubes: a small constant buffer, emit_color, holds a colour and a flag in w. For the crates and the floor w is 0 and the surface is lit; for a light cube w is 1 and the cube is simply its light's HDR colour, unlit. The lights are the constant buffer's initialiser, so the light cubes read their places and colours from that same global:
; lighting info: four lights, far brighter than 1. The constant buffer's
; initialiser; draw_lights reads the light cubes' places and colours from it
; too.
lights: lights_constants = {
    .positions = {
        { 0.0, 0.5, 1.5, 0.0 },
        { -4.0, 0.5, -3.0, 0.0 },
        { 3.0, 0.5, 1.0, 0.0 },
        { -0.8, 2.4, -1.0, 0.0 },
    },
    .colors = {
        { 5.0, 5.0, 5.0, 0.0 },
        { 10.0, 0.0, 0.0, 0.0 },
        { 0.0, 0.0, 15.0, 0.0 },
        { 0.0, 5.0, 0.0, 0.0 },
    },
}
; the lights themselves: no lighting, just their own HDR colour
xor ebx, ebx
draw_lights:
mov eax, ebx
shl eax, 4 ; * sizeof(vec4)
lea rsi, lights.colors
movups xmm0, [rsi + rax]
movups emit.color, xmm0
mov emit.color.w, 0x3F800000 ; 1.0: unlit
invoke(update_buffer, emit_buffer, emit&, sizeof(emit_constants))
mov eax, ebx
shl eax, 4
lea rdx, lights.positions ; a vec4, read as its vec3
add rdx, rax
lea rcx, model
movss xmm2, 0.25
call m4_translate_scale
invoke(draw_vertices, transforms_buffer, t&, cube_vb, 36, model&)
inc ebx
cmp ebx, 4
jb draw_lights
A light's colour is one vec4, sixteen bytes, so one movups moves it into emit whole, and the flag is stored over its w after. A float can be a memory operand but not an immediate, so the store of 1.0 is written as its bits, 0x3F800000; emit.color.w names the field, and rasm works out its offset and its size, a dword. The index is shifted left by 4 to make it a byte offset into the array, at run time, through rsi. Before the crates and floor, emit is cleared and sent, so their w is 0; a single vec4 needs no xorps xmm0, xmm0 and movups emit.color, xmm0.
After the colour is known, the shader decides whether it is bright. Comparing each channel against 1 would count a pure blue of strength 2 as just as bright as a pure green of strength 2, though to us the green looks several times brighter, so instead we convert to
This is where HDR earns its place in bloom. The four lights have colours (5, 5, 5), (10, 0, 0), (0, 0, 15) and (0, 5, 0), with luminances 5, 2.1, 1.08 and 3.6: all above the threshold, though the blue one only just. The crates, even close to the lights, mostly stay below it. With an 8-bit image we would have to put the threshold below 1, say at 0.8, and then any surface that happens to be well lit, a white wall or a field of snow, would start to glow too.
Gaussian blur
The bright image now needs blurring. In Framebuffers we blurred with a small kernel that averaged a pixel's neighbours. That is a
A
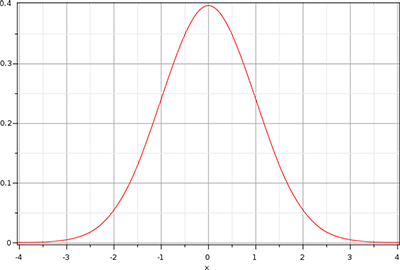
In two dimensions the weights form a round hill around the pixel. The trouble is cost: a blur 32 pixels across would read \(32 \times 32 = 1024\) texels for every pixel of the image. Fortunately the 2D Gaussian has a very useful property. It is
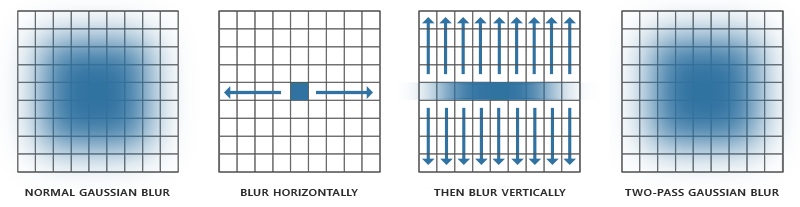
This is the
// one direction of a Gaussian blur: nine taps along `direction`
cbuffer blur : register(b1)
{
    float2 direction;
};

Texture2D source : register(t0);
SamplerState linear_clamp : register(s1);

static const float weights[5] = { 0.227027, 0.1945946, 0.1216216, 0.054054, 0.016216 };

float4 ps_main(fullscreen_vertex p) : SV_Target
{
    float3 sum = source.Sample(linear_clamp, p.uv).rgb * weights[0];
    for (int i = 1; i < 5; i++)
    {
        sum += source.Sample(linear_clamp, p.uv + direction * i).rgb * weights[i];
        sum += source.Sample(linear_clamp, p.uv - direction * i).rgb * weights[i];
    }
    return float4(sum, 1.0);
}
Nine taps: the centre and four on each side. The weights add up to 1 (the centre once, the others twice), so the blur moves light around without adding or removing any. They are not computed from the formula at run time; they are a row of binomial coefficients, which approximate a Gaussian well. Take row 12 of Pascal's triangle, drop the two smallest entries at each end, and divide by what remains: \(924 / 4070 = 0.227027\), \(792 / 4070 = 0.1945946\), and so on.
Where LearnOpenGL passes a horizontal flag and has two loops, we pass the step itself, direction: one texel along x for a horizontal pass, one texel along y for a vertical one. The same nine lines then serve both. The texture is read through a second sampler in slot s1, with clamping instead of wrapping, so that a light near the left edge of the screen does not bleed in at the right:
; s0 for textures; s1, linear and clamped, for the blur, which must not
; wrap round the edges
invoke(create_sampler, D3D11_FILTER.D3D11_FILTER_ANISOTROPIC, D3D11_TEXTURE_ADDRESS_MODE.D3D11_TEXTURE_ADDRESS_WRAP)
mov sampler, rax
vcall(context, ID3D11DeviceContextVtbl.PSSetSamplers, 0, 1, sampler&)
invoke(create_sampler, D3D11_FILTER.D3D11_FILTER_MIN_MAG_MIP_LINEAR, D3D11_TEXTURE_ADDRESS_MODE.D3D11_TEXTURE_ADDRESS_CLAMP)
mov clamp_sampler, rax
vcall(context, ID3D11DeviceContextVtbl.PSSetSamplers, 1, 1, clamp_sampler&)
Ping-pong
One horizontal plus one vertical pass is a single Gaussian blur, and nine taps is a narrow one. For a wider glow we simply blur the blurred image again, and again. Each pass reads one texture and writes another, and a texture cannot be both at once, so we keep two targets and bounce between them: draw from A into B, then from B into A, and so on. This is called
Our two ping-pong targets are half the window's width and height. The halves are known before the program runs, so they are constants, folded by the C compiler from the window's size:
; The blur targets' size. masm64-dx11 halved scr_width and scr_height at run
; time; C folds it here.
half_w: const u32 = SCR_WIDTH / 2
half_h: const u32 = SCR_HEIGHT / 2
; half_w and half_h are u32 globals: into their argument registers first,
; then passed as themselves
mov edx, half_w
mov r8d, half_h
invoke(create_render_target, pingpong[0]&, rdx, r8, DXGI_FORMAT.DXGI_FORMAT_R16G16B16A16_FLOAT, 1)
mov edx, half_w
mov r8d, half_h
invoke(create_render_target, pingpong[1]&, rdx, r8, DXGI_FORMAT.DXGI_FORMAT_R16G16B16A16_FLOAT, 1)
u32 global is only 32, so each one goes into its argument register as a 32-bit load first, which clears the top half, and is then passed as that register itself. pingpong is an array of two render_target structs, pingpong: [2]render_target = {}, and pingpong[1]& is the address of the second one, sizeof(render_target) bytes in.
This is a departure from LearnOpenGL, which blurs at full size, and it is nearly free quality. A blur is a low-frequency image; it has no fine detail to lose at lower resolution. At half size a pass costs a quarter of the work, and since each tap now steps over two full-size pixels, the same nine taps spread the glow twice as far. The first pass also does the downsampling for us, at no extra cost: the centre of each half-size pixel falls exactly on the corner where four full-size texels meet, so a bilinear sample there returns the average of all four.
The blur loop runs ten passes, alternately horizontal and vertical, which is five full Gaussian blurs:
; 2. blur bright fragments with two-pass Gaussian blur
; ----------------------------------------------------
invoke(shader_use, blur_shader&)
invoke(bind_constants, 1, blur_buffer)
mov ecx, half_w
mov edx, half_h
call set_viewport
mov rax, bright_target.srv
mov blur_source, rax
xor ebx, ebx
blur_passes:
; even passes blur along x, odd ones along y, one texel at a time
mov blur.direction.x, 0
mov blur.direction.y, 0
movss xmm0, 1.0
test ebx, 1
jnz along_y
cvtsi2ss xmm1, half_w
divss xmm0, xmm1
movss blur.direction.x, xmm0
jmp along_done
along_y:
cvtsi2ss xmm1, half_h
divss xmm0, xmm1
movss blur.direction.y, xmm0
along_done:
invoke(update_buffer, blur_buffer, blur&, sizeof(blur_constants))
call unbind_textures
; the target: pingpong[i % 2]
mov eax, ebx
and eax, 1
imul eax, eax, sizeof(render_target)
lea rsi, pingpong
add rsi, rax
lea rax, [rsi].render_target.rtv
vcall(context, ID3D11DeviceContextVtbl.OMSetRenderTargets, 1, rax, 0)
invoke(bind_texture, 0, blur_source)
vcall(context, ID3D11DeviceContextVtbl.Draw, 3, 0)
mov rax, [rsi].render_target.srv
mov blur_source, rax
inc ebx
cmp ebx, 10
jb blur_passes
A few things to notice. The viewport is changed to the half size before the loop, with first_iteration special case. And t0, and it must be unbound before it can become a render target. After pass 9, blur_source is the second ping-pong target, holding the finished blur.
In assembly the loop counter's lowest bit does the work of i % 2: test ebx, 1 picks the direction, and and eax, 1 times the struct's size picks the target, whose fields are then reached through the register, [rsi].render_target.rtv. The step is one over the half-size width or height, the 1.0 a float literal and the divisor converted from the integer constant with cvtsi2ss; the other component is cleared first by storing an integer zero over it, mov blur.direction.x, 0, which needs no size: the field is an f32, so the store is a dword, and an integer 0 has the same bits as 0.0.
Blending both textures
Step 3 adds the blur to the scene and tone maps the result. The shader is the HDR chapter's, with a second texture:
cbuffer combine : register(b1)
{
    float exposure;
    int bloom;
};

Texture2D scene_color : register(t0);
Texture2D blurred : register(t1);
SamplerState linear_clamp : register(s1);

float4 ps_main(fullscreen_vertex p) : SV_Target
{
    float3 color = scene_color.Sample(linear_clamp, p.uv).rgb;
    if (bloom) color += blurred.Sample(linear_clamp, p.uv).rgb;
    return float4(1.0 - exp(-color * exposure), 1.0);
}
The blur texture is half size, but the texture coordinates run from 0 to 1 whatever the size, and the linear filter stretches it back up smoothly. The order of operations matters: the glow is added while the values are still HDR, and only the sum is tone mapped. That way the glow around a light rolls off just as the light does, instead of being pasted on top of an image that has already been squeezed into 0..1. As in the HDR chapter, the sRGB back buffer view does the gamma encoding.
call unbind_textures
vcall(context, ID3D11DeviceContextVtbl.OMSetRenderTargets, 1, backbuffer_rtv&, 0)
vcall(context, ID3D11DeviceContextVtbl.RSSetViewports, 1, viewport&)
invoke(update_buffer, combine_buffer, combine&, sizeof(combine_constants))
invoke(shader_use, final_shader&)
invoke(bind_constants, 1, combine_buffer)
invoke(bind_texture, 0, color_target.srv)
invoke(bind_texture, 1, blur_source)
vcall(context, ID3D11DeviceContextVtbl.Draw, 3, 0)
The viewport goes back to full size for the final pass. The program starts with bloom on, combine: combine_constants = { .exposure = 1.0, .bloom = 1 }, and Tab switches it off and on:
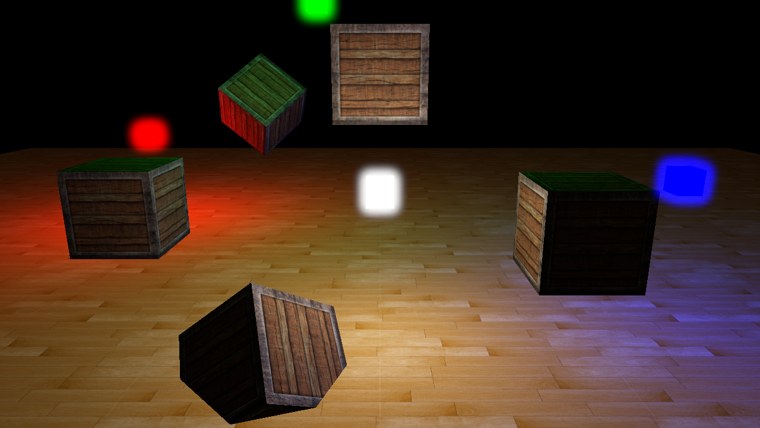
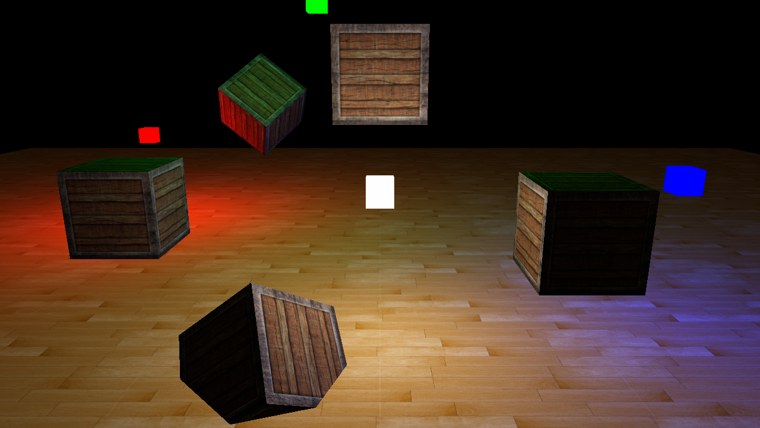
With bloom (left), the four light cubes glow, and the glow is coloured by each light; without it (right) they are flat patches with hard edges that read as painted squares rather than lamps. The lit crates and floor look the same in both images, because hardly anything on them crosses the threshold. That is the control HDR gives us: only what is really bright blooms.
The scene is small, so the effect is modest here. In a big scene with the sun glinting off water, or street lights at night, a good bloom makes a large difference. And because so much of the result depends on the blur, that is where improvements go. Common ones are more taps or more passes; combining blurs of several widths (one tight, one wide) to get a sharp core with a long soft tail; or blurring a chain of ever smaller copies of the bright image and adding them all together, which gives a very wide glow for little cost. The Additional resources below cover a few of these.
The full program is here, with its shaders for the scene here, the blur here and the final combine here.
Additional resources
- Efficient Gaussian blur with linear sampling: where the binomial weights come from, and how bilinear filtering can halve the number of taps.
- Bloom post process effect: Epic Games on building a better bloom from several Gaussians.
- How to do good bloom for HDR rendering: Kalogirou on blurring a chain of downsampled images.
- ID3D11DeviceContext::OMSetRenderTargets: binding several render targets at once, and the rules they must follow.
- LearnOpenGL's Bloom: the OpenGL version of this chapter.
Exercises
- Change the number of blur passes from 10 to 2, and then to 20. How does the size of the glow change, and how much does each extra pair of passes add?
- Make the ping-pong targets full size, as LearnOpenGL does (remember the viewport and the direction step). Compare the glow with the half-size version. Then try quarter size.
- Lower the brightness threshold in
bloom.hlslfrom 1.0 to 0.5. Which parts of the scene start to glow, and why does that look worse? - Add up and down keys for the exposure in the final pass, as in the HDR lesson, and see how the bloom behaves at low and high exposure.