Depth testing
Since Coordinate Systems a depth buffer has been quietly keeping the far side of every cube behind its near side. We created it, cleared it every frame and otherwise ignored it. This chapter looks at what it actually stores, how the test that uses it works, and why the numbers in it are less evenly spread than you might expect.
The
; window_create_depth's: 24 bits of depth, 8 of stencil, the window's size
window_depth_desc: D3D11_TEXTURE2D_DESC = {
    .Width = SCR_WIDTH,
    .Height = SCR_HEIGHT,
    .MipLevels = 1,
    .ArraySize = 1,
    .Format = DXGI_FORMAT.DXGI_FORMAT_D24_UNORM_S8_UINT,
    .SampleDesc = { .Count = 1 },
    .BindFlags = D3D11_BIND_FLAG.D3D11_BIND_DEPTH_STENCIL,
}
; A depth buffer the size of the window: 24 bits of depth, 8 of stencil.
window_create_depth: proc() = {
sub rsp, 40 ; 32 shadow, and rsp back on 16
vcall(device, ID3D11DeviceVtbl.CreateTexture2D, window_depth_desc&, 0, depth_texture&)
vcall(device, ID3D11DeviceVtbl.CreateDepthStencilView, depth_texture, 0, depth_dsv&)
add rsp, 40
ret
}
Everything about this texture is known before the program runs, so its description is a global of the SDK's own type, D3D11_TEXTURE2D_DESC, written out with designated initialisers; the fields left out are zero. The proc only hands its address to the device. It makes no calls with more than four arguments, so its frame is the 32 bytes of shadow space plus 8 that put rsp back on a 16-byte boundary, written out at the top and undone before the ret.
In OpenGL the windowing library makes this buffer for you; in Direct3D it is an ordinary texture that we create ourselves. DXGI_FORMAT_D24_UNORM_S8_UINT packs 24 bits of depth, stored as a fixed-point fraction from 0 to 1, with 8 bits of stencil that the next chapter uses. 24 bits is the common choice; DXGI_FORMAT_D32_FLOAT gives a 32-bit float instead. To be drawn into, the texture gets a
window_begin: proc(color: *const f32) = {
    push rbx
    sub rsp, 48                            ; ClearDepthStencilView takes 5: 32 + 8; entry 8 + push 8 + 48 lands on 16
    mov rbx, rcx                           ; the colour: vcall's first move is into rcx
    vcall(context, ID3D11DeviceContextVtbl.OMSetRenderTargets, 1, backbuffer_rtv&, depth_dsv)
    vcall(context, ID3D11DeviceContextVtbl.RSSetViewports, 1, viewport&)
    vcall(context, ID3D11DeviceContextVtbl.ClearRenderTargetView, backbuffer_rtv, rbx)
    cmp depth_dsv, 0
    je no_depth
    ; The depth is a float: the fourth argument, counting `this`, so it
    ; travels in xmm3 and the 0 in its place below is only a placeholder.
    movss xmm3, 1.0
    vcall(context, ID3D11DeviceContextVtbl.ClearDepthStencilView, depth_dsv,
          D3D11_CLEAR_FLAG.D3D11_CLEAR_DEPTH | D3D11_CLEAR_FLAG.D3D11_CLEAR_STENCIL, 0, 0)
  no_depth:
    add rsp, 48
    pop rbx
    ret
}this pointer comes first. Win64 passes a float in the xmm register of its position, so the depth, fourth counting this, goes in xmm3, not xmm0. 0 holds its place in the argument list (where it lands in r9, which the method ignores). The 1.0 in movss xmm3, 1.0 is not an immediate, since SSE instructions take none: rasm puts the float in read-only memory and the instruction loads it from there. The last 0 is the stencil clear value, an integer on the stack, which is why this frame is 48 bytes rather than 40: 32 of shadow space and 8 for the fifth argument, with the push of rbx counted in the alignment.
Forgetting the clear has the effect you would guess: last frame's depths stay, and this frame's pixels are tested against surfaces that are no longer there.
With a depth buffer bound, the
SV_Depth turns it off, and one that discards pixels with
Unlike OpenGL, where depth testing is off until glEnable(GL_DEPTH_TEST), Direct3D has it on by default. What controls it is a
A depth-stencil state is made from a D3D11_DEPTH_STENCIL_DESC. Its depth part has three fields, here as the stencil lesson sets them: two in the description's initialiser, and the third, whether to test at all, stored by the proc that makes each state:
create_stencil_state_desc: D3D11_DEPTH_STENCIL_DESC = {
    .DepthWriteMask = D3D11_DEPTH_WRITE_MASK.D3D11_DEPTH_WRITE_MASK_ALL,
    .DepthFunc = D3D11_COMPARISON_FUNC.D3D11_COMPARISON_LESS,
; ...
}
mov create_stencil_state_desc.DepthEnable, r8d
An enum's members are named through the enum, D3D11_COMPARISON_FUNC.D3D11_COMPARISON_LESS, as the binding generated from the SDK headers declares them. DepthEnable turns the test on or off. DepthWriteMask says whether passing pixels update the buffer: D3D11_DEPTH_WRITE_MASK_ZERO keeps testing but stops writing, a read-only depth buffer, which is what glDepthMask(GL_FALSE) does. That is useful for things like particles, which should be hidden by walls without hiding each other. DepthFunc is the comparison.
Depth test function
The comparison decides which pixels survive. It is written "new depth function stored depth", and Direct3D offers the same eight as OpenGL's
| Function | The pixel passes when |
|---|---|
| D3D11_COMPARISON_NEVER | never |
| D3D11_COMPARISON_LESS | its depth is less than the stored depth (the default) |
| D3D11_COMPARISON_EQUAL | its depth equals the stored depth |
| D3D11_COMPARISON_LESS_EQUAL | its depth is less than or equal to the stored depth |
| D3D11_COMPARISON_GREATER | its depth is greater than the stored depth |
| D3D11_COMPARISON_NOT_EQUAL | its depth differs from the stored depth |
| D3D11_COMPARISON_GREATER_EQUAL | its depth is greater than or equal to the stored depth |
| D3D11_COMPARISON_ALWAYS | always |
LESS is "keep whatever is nearer", which is what we want nearly all the time. To see what the test buys us, imagine a state with ALWAYS:
always_desc: D3D11_DEPTH_STENCIL_DESC = {
    .DepthEnable = 1,
    .DepthWriteMask = D3D11_DEPTH_WRITE_MASK.D3D11_DEPTH_WRITE_MASK_ALL,
    .DepthFunc = D3D11_COMPARISON_FUNC.D3D11_COMPARISON_ALWAYS,     ; every pixel passes
}
Every pixel passes, so whatever is drawn last ends up on top, which is the same as having no depth test. Our scene draws the floor first and then the two cubes, so with ALWAYS the cubes would still cover the floor. Within each cube, though, the faces would cover each other in the order they appear in the vertex array rather than by distance, and some far faces would show through near ones. Try it in the exercises.
The drawing itself is short. From this chapter on, & is a global's address, here a model matrix and the transforms handed over by pointer:
; the floor, then two cubes on it
invoke(bind_texture, 0, floor_texture)
invoke(m4_identity, model&)
invoke(draw_vertices, transforms_buffer, t&, plane_vb, 6, model&)
invoke(bind_texture, 0, cube_texture)
invoke(m4_translate, model&, cube_a&)
invoke(draw_vertices, transforms_buffer, t&, cube_vb, 36, model&)
invoke(m4_translate, model&, cube_b&)
invoke(draw_vertices, transforms_buffer, t&, cube_vb, 36, model&)
sub rsp, 40, 32 bytes of shadow space and 8 for the model.
Depth value precision
The depth buffer holds values from 0 to 1, but the distances in our scene run from the near plane to the far plane, here 0.1 to 100. Something maps one onto the other. The obvious mapping would be linear:
\[ F_{depth} = \frac{z - near}{far - near} \]where \(z\) is the distance from the camera. Equal steps in distance would then be equal steps in depth, as in LearnOpenGL's graph (drawn for near = 1 and far = 50):
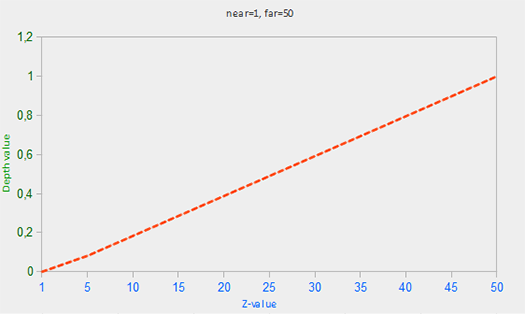
Depth buffers practically never work that way. A perspective projection divides by distance (that is what makes far things small), and the depth it produces is divided too. What ends up in the buffer is proportional to \(1/z\):
\[ F_{depth} = \frac{1/z - 1/near}{1/far - 1/near} \]
This is exactly the depth Direct3D stores. We can check it against our projection matrix, [rcx].mat4.m[10], and rasm works out that this one is 40 bytes in:
movss xmm4, dword ptr [rsp + 80]       ; z_far
movaps xmm2, xmm3
subss xmm2, xmm4                       ; near - far
movaps xmm0, xmm4
divss xmm0, xmm2
movss [rcx].mat4.m[10], xmm0           ; far / (near - far)
movaps xmm0, xmm3
mulss xmm0, xmm4
divss xmm0, xmm2
movss [rcx].mat4.m[11], xmm0           ; near * far / (near - far)
mov dword ptr [rcx].mat4.m[14], 0xBF800000    ; -1
(0xBF800000 is the bit pattern of the float -1.0: storing it as an integer saves a constant. The far plane is the fifth argument, so it arrives on the stack, at [rsp + 40] on entry and [rsp + 80] once the proc has made its own 40-byte frame.) For a point at distance \(z\) in front of the camera (view-space z equal to \(-z\), since the camera looks down -z), row 2 gives clip-space z and row 3 gives w:
which is 0 at the near plane, 1 at the far plane, and, with a little algebra, the same as the formula above. OpenGL's projection produces the same curve over -1 to 1 and then maps it to 0 to 1 when writing the buffer; Direct3D's lands in 0 to 1 directly, which is one reason the D3D version of the formulas below is slightly simpler.
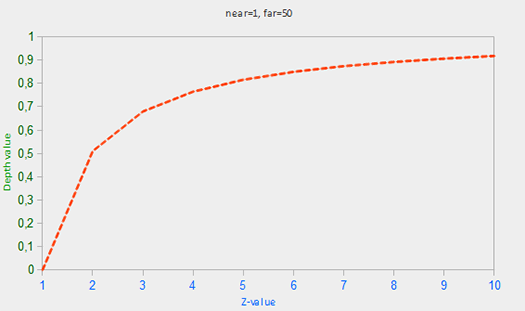
LearnOpenGL's graph shows how lopsided this is. With our near of 0.1 and far of 100 it is more extreme still. Half of the whole range, 0 to 0.5, is used up by the first tenth of a unit past the near plane (depth reaches 0.5 at a distance of about 0.2). One unit away the depth is already 0.90, two units away 0.95, ten units away 0.99. Everything from ten units to a hundred shares the last one percent.
That sounds wasteful, but it is roughly what we want: things close to the camera are big on screen and need fine depth distinctions, while far things are small and need fewer. The catch is that the precision far away can run out, which we come back to with z-fighting.
Visualizing the depth buffer
The lesson shows the depth directly. In a pixel shader, the SV_Position input is not a clip-space position any more; it is the pixel itself: x and y in pixels from the top-left corner (OpenGL's gl_FragCoord counts from the bottom-left), and z the depth about to be tested. So the shader can return that z as a grey:
float4 ps_main(vs_out p) : SV_Target
{
    // In a pixel shader SV_Position is the pixel: x and y in pixels, z the
    // depth about to be tested. GL calls it gl_FragCoord.
    float depth = p.position.z;
    if (mode == 1) return float4(depth.xxx, 1.0);
    if (mode == 2) return float4((linear_depth(depth) / 10.0).xxx, 1.0);
    return albedo.Sample(linear_wrap, p.uv);
}
The mode comes from a small constant buffer in b1, together with the near and far planes:
cbuffer view_mode : register(b1)
{
    int mode;
    float near_plane;
    float far_plane;
};
; Mirrors `cbuffer view_mode` in depth_testing.hlsl.
view_constants: struct = {
mode: u32 ; 0 textured, 1 raw depth, 2 linear depth
near_plane: f32
far_plane: f32
pad: f32
}v: view_constants = { .near_plane = 0.1, .far_plane = 100.0 }
The padding makes the struct 16 bytes, one HLSL register, as constant buffers require. The planes are written straight into the initialiser, which is compiled as C, so the literals become floats there; the mode and the padding start at zero. Tab steps through the three modes, with
invoke(window_mode_default, 2)invoke(window_mode, 3)
mov v.mode, eax
v.mode is a field of a typed global, so the store needs no offset and no size: rasm knows it is the first four bytes of v.
Here is the raw depth, mode 1, beside the ordinary scene:
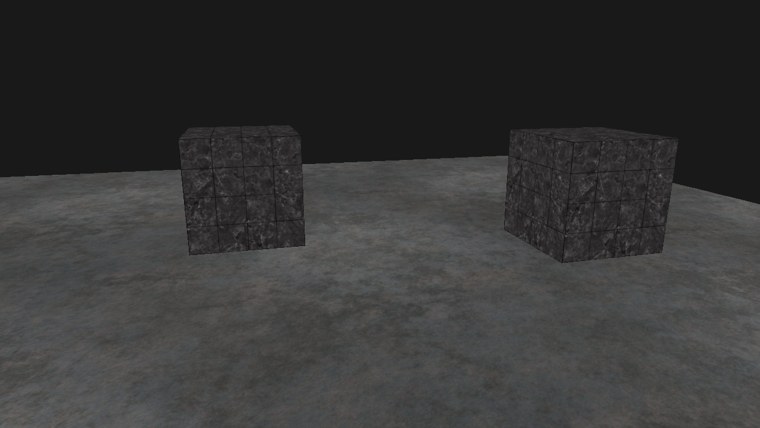

Nearly everything is white. Given the numbers in the previous section, that is no surprise: the camera starts about five units from the cubes, where the depth is around 0.98. Only the bit of floor right in front of the camera is a shade darker. Fly very close to a cube and it will turn grey and then black, within a fraction of a unit. (The background is the clear colour, since nothing was drawn there.)
To see real distances we undo the projection. Solving the depth formula for \(z\):
\[ z = \frac{near \cdot far}{far - depth\,(far - near)} \]which in HLSL is
// The eye-space distance a 0..1 depth came from: the projection, undone.
float linear_depth(float depth)
{
    return near_plane * far_plane / (far_plane - depth * (far_plane - near_plane));
}
LearnOpenGL's version first turns the depth back into a -1 to 1 value, z * 2.0 - 1.0, because that is the range OpenGL's projection produced. Ours skips that step, since Direct3D's projection already produced 0 to 1. Copying the GLSL formula as it is would give wrong distances, a typical small trap when porting.
The result is a distance in world units, from 0.1 to 100. The shader divides it by 10 to fit a range that suits this small scene: black at the camera, white from ten units on. LearnOpenGL divides by the far plane, which leaves its picture nearly black.
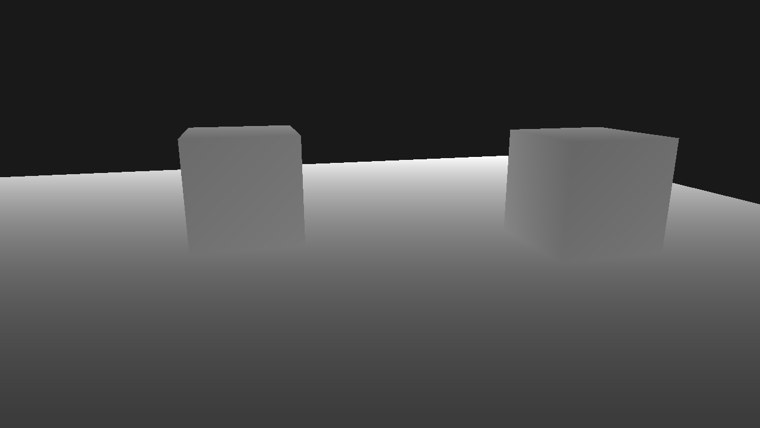
Now the floor fades evenly from dark near the camera to white in the distance, and the cubes, about five units away, are a middle grey. Move around and the greys change in proportion to how far you move. The full program is here, and its shader here.
Z-fighting
When two surfaces lie in the same plane, or so close that the depth buffer cannot tell them apart, neither one consistently wins the depth test. Which one shows flips from pixel to pixel and from frame to frame as the camera moves, in jagged stripes. This is called
Our scene has a case of it built in. The cubes are 1 unit tall and centred at y = 0, so their bottoms are at y = -0.5, exactly the height of the floor. From outside you never see a cube's bottom face, but you can from inside. The Face culling lesson starts out removing the cubes' front faces, which opens them up, and its first frame shows the fight on their floors:
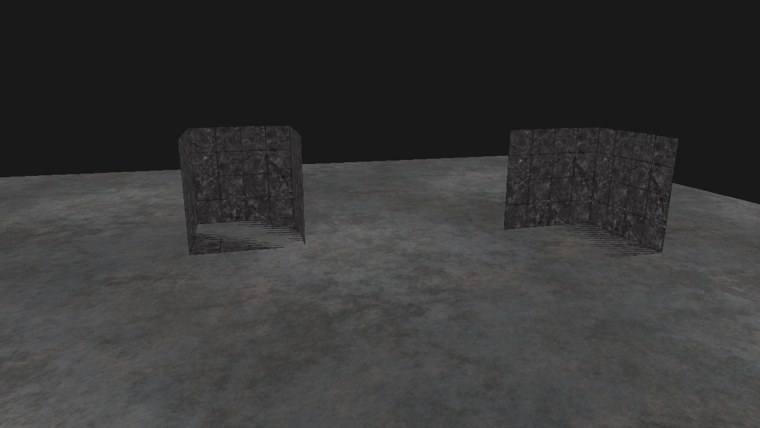
The stripes at the bottom of each cube are the metal floor and the cube's own bottom face taking turns. Z-fighting gets worse with distance, because, as we saw, precision drops off the farther a surface is.
Prevent z-fighting
It cannot be removed entirely, but a few habits keep it away:
- Do not put surfaces on top of each other. Lifting our cubes by a hundredth of a unit would end the fight here and nobody would see the gap. This is the most effective fix, but it has to be done object by object.
- Push the near plane out. Precision is concentrated just past the near plane, so moving it from 0.1 to, say, 0.5 spreads much more of it over the rest of the scene. Too far and nearby objects get clipped, so it is a matter of tuning per scene.
- Use more bits. DXGI_FORMAT_D32_FLOAT (or D32_FLOAT_S8X24_UINT with stencil) has more precision than a 24-bit buffer, at some cost in memory and bandwidth.
glClipControl, since its -1 to 1 range spoils the trick.
Additional resources
- Configuring depth-stencil functionality: Microsoft's guide to depth-stencil textures, views and states.
- Depth Precision Visualized: Nathan Reed's illustrated explanation of depth precision and reversed-Z.
- OpenGL Projection Matrix: Song Ho Ahn's derivation of the projection, including where the \(1/z\) comes from (for OpenGL's -1 to 1 range).
Exercises
- Create a depth-stencil state with DepthFunc set to D3D11_COMPARISON_ALWAYS, bind it with
OMSetDepthStencilState before drawing, and look at the cubes from different sides. Which faces show through, and why those? - Change the near plane in
camera_projection (themovss xmm3, 0.1in camera.rasm) and in near_plane from 0.1 to 1.0, then look at the raw depth view again. How close can you get to a cube before it is clipped? - Get rid of the z-fighting in the face culling lesson by lifting the cubes slightly. How small a lift still works when you fly far away?