HDR
Every render target we have drawn into so far stores its colours as 8-bit unsigned normalized numbers: each channel is a whole number from 0 to 255, read back as a value from 0.0 to 1.0. Whatever a pixel shader returns is squeezed into that range on the way out. A value of 3.7 is stored as 1.0, and so is 1.2, and so is 250. For most of the earlier chapters that was fine, because we chose light colours and strengths carefully so that nothing ever went much past 1. But it is a restriction on the scene, not a property of light. Put two bright lights next to each other, or one very bright light in a dark room, and the sums go past 1 and get cut off. Large patches of the image become the same flat white, and all the detail that was there (a wood grain, the shape of a highlight) is gone.
We could dim every light until nothing overflows, but then we are no longer describing the scene we want; we are bending the lighting to fit the storage. The better approach is to let colours go as high as the lighting makes them while we render, and only at the very end turn that wide range into the 0 to 1 a monitor can show, in a way that keeps detail at both the bright and the dark end.
A monitor (a regular one, not an HDR display) can only show values from 0 to 1, but the lighting equations have no such limit. When we allow colours above 1 we are working in
The idea comes from photography. A camera sensor can only record a limited range at once, so a photographer who wants both the sunlit window and the shadowed room takes several shots at different
HDR rendering works the same way. We render into a target that can hold the full range, so nothing is lost, and as a final step we convert the HDR values back to LDR. That conversion is called
A pleasant side effect is that lights can be given strengths that reflect their real brightness. The sun really is many times brighter than a desk lamp, and with HDR we can say so: a light of strength 100 is not a mistake that clamps to white, it is just a very bright light, and tone mapping decides how it ends up on screen.
Floating point framebuffers
To keep values above 1 we need a render target that does not clamp them. The 8-bit formats we have used (DXGI_FORMAT_R8G8B8A8_UNORM and its _SRGB twin) are
DXGI has a few of them that can be render targets:
- DXGI_FORMAT_R16G16B16A16_FLOAT: four 16-bit "half" floats, 8 bytes per pixel. Halves reach about 65000 and keep roughly three significant decimal digits, which is plenty for colour. This is the usual choice, and ours.
- DXGI_FORMAT_R32G32B32A32_FLOAT: four full 32-bit floats, 16 bytes per pixel. Four times the memory of an 8-bit target, and more precision than colour needs.
- DXGI_FORMAT_R11G11B10_FLOAT: three small floats packed into 4 bytes, no alpha and no negative values. Half the size of the 16-bit format, and a common choice when bandwidth matters.
Our floating point target is made with the same procedure as the off-screen targets in Framebuffers,
; A texture that can be drawn into (rtv) and then read (srv): GL's
; framebuffer colour attachment.
render_target: struct = {
    texture: *ID3D11Texture2D
    rtv: *ID3D11RenderTargetView
    srv: *ID3D11ShaderResourceView
}

create_render_target_desc: D3D11_TEXTURE2D_DESC = {
    .MipLevels = 1,
    .ArraySize = 1,
    .BindFlags = D3D11_BIND_FLAG.D3D11_BIND_RENDER_TARGET | D3D11_BIND_FLAG.D3D11_BIND_SHADER_RESOURCE,
}

; rcx: render_target, edx: width, r8d: height, r9d: format, [rsp + 40]: samples (1 unless MSAA)
create_render_target: proc(out: *render_target, w: u32, h: u32, format: DXGI_FORMAT, samples: u32) = {
    push rbx
    sub rsp, 32                            ; 32 shadow; entry 8 + push 8 + 32 lands on 16
    mov rbx, rcx
    mov create_render_target_desc.Width, edx
    mov create_render_target_desc.Height, r8d
    mov create_render_target_desc.Format, r9d
    mov eax, dword ptr [rsp + 80]          ; samples: [rsp + 40] on entry, + 8 + 32
    mov create_render_target_desc.SampleDesc.Count, eax
    lea rax, [rbx].render_target.texture
    vcall(device, ID3D11DeviceVtbl.CreateTexture2D, create_render_target_desc&, 0, rax)
    assert_hr()
    lea rax, [rbx].render_target.rtv
    vcall(device, ID3D11DeviceVtbl.CreateRenderTargetView, [rbx].render_target.texture, 0, rax)
    lea rax, [rbx].render_target.srv
    vcall(device, ID3D11DeviceVtbl.CreateShaderResourceView, [rbx].render_target.texture, 0, rax)
    add rsp, 32
    pop rbx
    ret
}
The texture description is a global with a designated initialiser, holding everything that never changes (one mip level, one array slice, the two bind flags, each a qualified member of its enum, D3D11_BIND_FLAG.D3D11_BIND_RENDER_TARGET); the proc stores only the size, the format and the sample count. Each store names its field, mov create_render_target_desc.Width, edx, and rasm works out the offset and the size from the binding the lessons import, includes/d3d11.rin, generated from the SDK headers, with C checking every offset against the header when the program builds. The frame is written out: one push, then sub rsp, 32 for the shadow space, which with the return address and the push lands rsp on 16. That is also why the fifth argument, the sample count, is read at [rsp + 80]: it was at [rsp + 40] on entry, and the push and the sub moved rsp down 40 more. The COM methods are named by their slot in the interface's table of functions, ID3D11DeviceVtbl.CreateTexture2D.
The format is a parameter, so making an HDR target is only a matter of which format we pass. It also needs a depth buffer of its own size, since the scene is drawn into it with depth testing:
; configure floating point framebuffer
; ------------------------------------
invoke(create_render_target, hdr_target&, SCR_WIDTH, SCR_HEIGHT, DXGI_FORMAT.DXGI_FORMAT_R16G16B16A16_FLOAT, 1)
invoke(create_depth_buffer, SCR_WIDTH, SCR_HEIGHT, 1)
mov hdr_depth, rax
Drawing into a float target is no different from drawing into any other. Every frame we bind it, clear it, draw the lit scene, and then switch to the back buffer for a second pass that reads the float texture and writes the final image:
; 1. render scene into floating point framebuffer
; -----------------------------------------------
call unbind_textures
vcall(context, ID3D11DeviceContextVtbl.OMSetRenderTargets, 1, hdr_target.rtv&, hdr_depth)
vcall(context, ID3D11DeviceContextVtbl.RSSetViewports, 1, viewport&)
vcall(context, ID3D11DeviceContextVtbl.ClearRenderTargetView, hdr_target.rtv, black&)
movss xmm3, 1.0                        ; the depth, a float: xmm3
vcall(context, ID3D11DeviceContextVtbl.ClearDepthStencilView, hdr_depth, D3D11_CLEAR_FLAG.D3D11_CLEAR_DEPTH, 0, 0)
; ...
invoke(draw_vertices, transforms_buffer, t&, cube_vb, 36, tunnel&)

; 2. render floating point colour buffer to the screen, tone mapped
; -----------------------------------------------------------------
; One triangle covering the screen, made by the vertex shader from
; SV_VertexID alone.
vcall(context, ID3D11DeviceContextVtbl.OMSetRenderTargets, 1, backbuffer_rtv&, 0)
invoke(update_buffer, tone_buffer, tone&, sizeof(tone_constants))
invoke(shader_use, hdr_shader&)
invoke(bind_constants, 1, tone_buffer)
invoke(bind_texture, 0, hdr_target.srv)
vcall(context, ID3D11DeviceContextVtbl.Draw, 3, 0)
hdr_target.rtv& is the address of the struct's rtv field, a constant the linker fills in, which is exactly the one-element array of views that black: [4]const f32 = { 0.0, 0.0, 0.0, 1.0 }, and the clear depth is a float literal: movss xmm3, 1.0 loads 1.0 from a constant rasm pools in .rdata, into the register of the fourth argument. The SV_VertexID, and the shader created with no input layout (invoke(shader_create, hdr_shader&, "src/5.advanced_lighting/6.hdr/hdr.hlsl", 0, 0)). The back buffer is bound with no depth buffer, a 0 for the depth view, since a single triangle needs no depth test.
The scene
To have something worth tone mapping, the scene is a long tunnel: the cube from earlier chapters stretched to 5 by 5 by 55 units, which we look at from inside. Since we see its inner faces, the pixel shader flips the normals. Four point lights hang in it: three very dim coloured ones near the camera, and one white light at the far end that is two hundred times brighter than anything else.
; Mirror `cbuffer lights` in lighting.hlsl and `cbuffer tone` in hdr.hlsl.
lights_constants: struct = {
    positions: [4]vec4
    colors: [4]vec4
}
; ...
; lighting info: one bright light at the far end, three dim coloured ones near
; the camera. masm64-dx11 kept these in two arrays and copied them into
; `lights` at start-up; here they are the constant buffer's initialiser, and
; only the upload is code.
lights: lights_constants = {
    .positions = {
        { 0.0, 0.0, -49.5, 0.0 },
        { -1.4, -1.9, -9.0, 0.0 },
        { 0.0, -1.8, -4.0, 0.0 },
        { 0.8, -1.7, -6.0, 0.0 },
    },
    .colors = {
        { 200.0, 200.0, 200.0, 0.0 },
        { 0.1, 0.0, 0.0, 0.0 },
        { 0.0, 0.0, 0.2, 0.0 },
        { 0.0, 0.1, 0.0, 0.0 },
    },
}
The lights never move, so the constant buffer's struct is simply initialised with them, as the comment says, and sent once, before the render loop. The tunnel's model matrix is made there too, from two constant vectors, tunnel_center: const vec3 = { 0.0, 0.0, -25.0 } and tunnel_size: const vec3 = { 5.0, 5.0, 55.0 }:
; lighting info
; -------------
invoke(update_buffer, lights_buffer, lights&, sizeof(lights_constants))

; the tunnel: a long box around the camera, seen from inside
invoke(m4_translate, tunnel&, tunnel_center&)
invoke(m4_scale, scratch&, tunnel_size&)
invoke(m4_mul, tunnel&, tunnel&, scratch&)
The lighting is plain diffuse with inverse-square falloff, the physically correct kind from Gamma Correction, and no ambient term. The point to notice is the last line: whatever the loop adds up is returned as it is.
float4 ps_main(vs_out p) : SV_Target
{
    float3 color = albedo.Sample(linear_wrap, p.uv).rgb;
    // seen from inside the tunnel
    float3 n = -normalize(p.normal);
    float3 lit = 0.0;
    for (int i = 0; i < 4; i++)
    {
        float3 to_light = light_positions[i].xyz - p.world;
        float d = length(to_light);
        lit += max(dot(n, to_light / d), 0.0) * color * light_colors[i].rgb / (d * d);
    }
    // no clamping: values far above 1 are kept, which is the point
    return float4(lit, 1.0);
}
The end wall of the tunnel is 3 units from the big light, so it receives \(200 / 3^2 \approx 22\) times the wood's colour; the side walls next to the light, 2.5 units away, get about 32 times. Into an 8-bit target all of that would be stored as 1. In the float target it is stored as 22 and 32, and the next pass gets to decide what to do with it.
If pass 2 only copied the texture to the screen, we would gain nothing: the back buffer is 8-bit, so the clamp would simply happen there instead. The far end of the tunnel would be a flat, featureless white, as if we had never used a float target at all. Something has to bring the values down into 0..1 first.
Tone mapping
Tone mapping is a function from HDR colour to LDR colour: it takes any value from 0 upwards and returns something from 0 to 1, ideally keeping differences visible over the whole range. Plain clamping is the worst possible such function, since it maps everything above 1 to the same value.
One of the simplest good ones is
Small values pass almost unchanged (0.1 becomes 0.09), 1 becomes 0.5, and huge values creep towards 1 without ever reaching it, so 22 and 32 still come out different (0.957 and 0.970). In HLSL it is one line:
float3 mapped = color / (color + 1.0);Reinhard spreads the whole range evenly, which tends to make the image look a little flat and favours the bright end: the dark parts of the scene get compressed along with everything else.
Our lesson uses an operator with a knob instead.
For small values it is close to \(c \cdot \text{exposure}\), so the exposure scales the darks like a camera's shutter time; for large values it flattens out towards 1, softly, rather than hitting a wall. Raising the exposure brightens the dark parts and pushes the bright parts into saturation; lowering it does the reverse. A game with a day-night cycle might use a low exposure at noon and a high one at night, and keep the same light strengths throughout.
The curves show the differences at a glance. Clamping is a straight line that stops dead at 1. Reinhard rises slowly and is still well short of 1 at 6. The exposure curves rise faster the larger the exposure, so exposure 2 has used up nearly all of its range by an HDR value of 2, while exposure 0.5 still has room to tell 4 from 6.
Here is the whole tone mapping pixel shader:
cbuffer tone : register(b1)
{
    float exposure;
    int enabled;
};

Texture2D hdr_buffer : register(t0);
SamplerState linear_wrap : register(s0);

float4 ps_main(fullscreen_vertex p) : SV_Target
{
    float3 color = hdr_buffer.Sample(linear_wrap, p.uv).rgb;
    // The back buffer view is sRGB, so the result is gamma encoded on the
    // way out; no pow(1/2.2) here.
    if (enabled) color = 1.0 - exp(-color * exposure);
    return float4(saturate(color), 1.0);
}
LearnOpenGL's version ends with pow(mapped, 1.0 / 2.2) to gamma-correct the result. We do not need it: since Gamma Correction the back buffer has been written through an R8G8B8A8_UNORM_SRGB render target view, which applies the sRGB curve in hardware as each pixel is stored. The order of the steps still matters, though. Tone mapping works on linear light, so it must come before the sRGB encoding, and it does: the shader works on linear values and the encoding happens in the output merger, after the shader is done.
When enabled is 0 the colour goes straight to cbuffer, padded to a whole 16-byte register, and its global starts out with tone mapping on and an exposure of 1:
tone_constants: struct = {
    exposure: f32
    enabled: u32
    pad: [2]u32
}
tone: tone_constants = { .exposure = 1.0, .enabled = 1 }and the keyboard drives them: Tab toggles tone mapping, and holding Up or Down changes the exposure by one unit per second, never letting it fall below 0.01:
; mode 0 tone maps, mode 1 shows the values clamped
invoke(window_mode, 2)
mov ecx, 1
sub ecx, eax
mov tone.enabled, ecx
invoke(key_down, VK_UP)
test eax, eax
jz not_up
movss xmm0, tone.exposure
addss xmm0, delta_time
movss tone.exposure, xmm0
not_up:
invoke(key_down, VK_DOWN)
test eax, eax
jz not_down
movss xmm0, tone.exposure
subss xmm0, delta_time
maxss xmm0, 0.01                       ; never quite 0
movss tone.exposure, xmm0
not_down:
maxss is SSE's scalar maximum, the clamp at 0.01 in one instruction, and since a float literal is a constant in memory, maxss xmm0, 0.01 takes it as its operand directly, with no register to load it into first. tone.exposure and tone.enabled are typed operands too: rasm knows one is an f32 and the other a u32, and where each sits in the struct.
The program starts with tone mapping on and an exposure of 1:
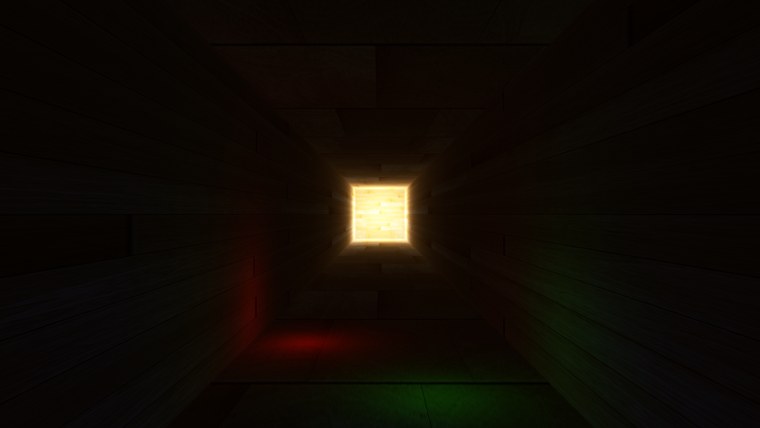
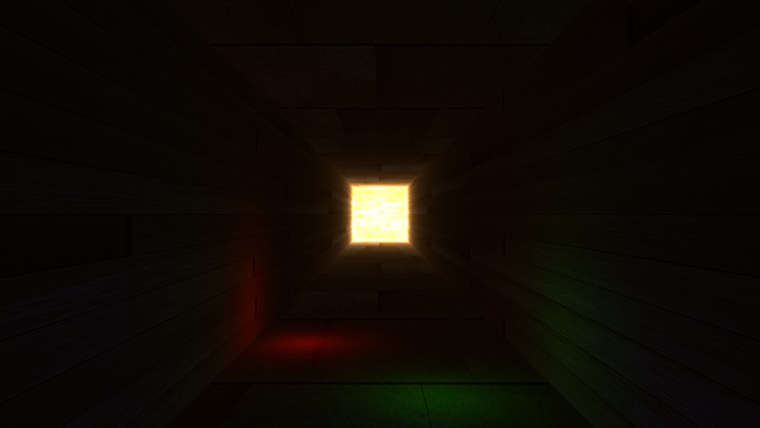
On the left, tone mapped; on the right, after Tab, clamped. Near the camera the two are nearly identical, as they should be: values there are small, and \(1 - e^{-c}\) is close to \(c\) for small \(c\). The difference is at the far end. Clamped, the end wall is a uniform glare; tone mapped, the planks and their seams are still visible inside the bright square. Hold Down to lower the exposure and the far end calms down until the wood is plainly visible, while the near end sinks into black. Hold Up and the dim coloured lights by the camera come out of the dark, while the far end burns out. No single exposure shows everything, but every part of the scene is there to be shown, which is what the float target bought us.
The full program is here, its lighting shader here and the tone mapping shader here.
More HDR
The two operators above are only the start of a large family. Some are fitted to the response of film stock and give a pleasing roll-off in the highlights (the "filmic" curves many games use, such as the ACES approximation); some work on luminance only, to avoid shifting colours as they saturate; some adapt locally, compressing a bright window differently from the dark wall around it.
Another common addition is
Our tunnel is a small demonstration of a big idea. In a full scene with many lights the benefits add up: nothing clamps when lights overlap, light strengths can be set to plausible values, and detail survives at both ends. It also makes effects built on brightness, such as bloom, far easier to control, because "brighter than 1" finally means something.
Additional resources
- Does HDR rendering have any benefits if bloom won't be applied?: a long, careful answer on what HDR buys a renderer by itself.
- What is tone mapping? How does it relate to HDR?: the photographer's view of tone mapping, with good example images.
- DXGI_FORMAT: every format Direct3D knows, including the float ones.
- LearnOpenGL's HDR: the OpenGL version of this chapter.
Exercises
- Replace the exposure curve in
hdr.hlslwith Reinhard,color / (color + 1.0), and compare the far end of the tunnel and the dim lights near the camera with what exposure 1 gives. - Change the HDR target's format to DXGI_FORMAT_R8G8B8A8_UNORM and run the program with tone mapping on. Explain what you see, and why tone mapping can no longer help.
- Try DXGI_FORMAT_R11G11B10_FLOAT for the HDR target. Can you see any difference from the 16-bit format? What does the format give up, and why does this lesson not need it?
- Make the exposure adjust itself: every frame, move it a little towards a target that is larger when the camera is near the dark entrance of the tunnel and smaller when it is near the bright end (the camera's z position is enough to decide).